ProudNet UE5 Example
A comprehensive guide for implementing multiplayer games using ProudNet networking library and Unreal Engine 5. Covers chat systems, character networking, and advanced multiplayer features.
📋 Table of Contents
- 1. Project Setup
Prepare and configure Unreal Engine 5 project for ProudNet integration
- 2. Creating Local Chat
Create a basic local chat system for testing and foundation
- 3. Creating Online Chat
Implement network chat functionality using ProudNet
- 4. Implementing Mirage Character
Build a mirage character with enhanced gameplay features
- 5. Mirage Character Online Integration
Integrate mirage character with ProudNet networking for multiplayer gameplay
- 6. Final Project Build and Testing
Project finalization, build, and comprehensive testing procedures
1. Project Setup
This section covers the initial setup and configuration needed to create an Unreal Engine 5 project with ProudNet enabled.
1.1. ProudNet Installation
- Install the latest release from the https://github.com/Nettention/ProudNet repository.
- The default installation path is "C:\Program Files (x86)\Nettention\ProudNet". This guide and the UE5 plugin are configured for this path, so if you change the installation path, you'll need to modify the plugin source code and carefully review the guide.
1.2. Visual Studio Project Configuration
- Create a blank project in Visual Studio
- This guide uses the following path/name.
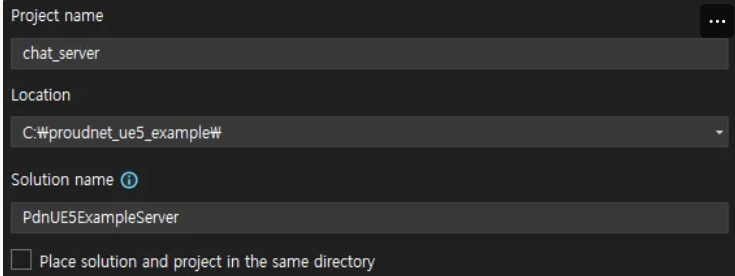
Visual Studio Project Creation
- Add 3 new items to the chat_server project: main.cpp, setting.cpp, setting.h.
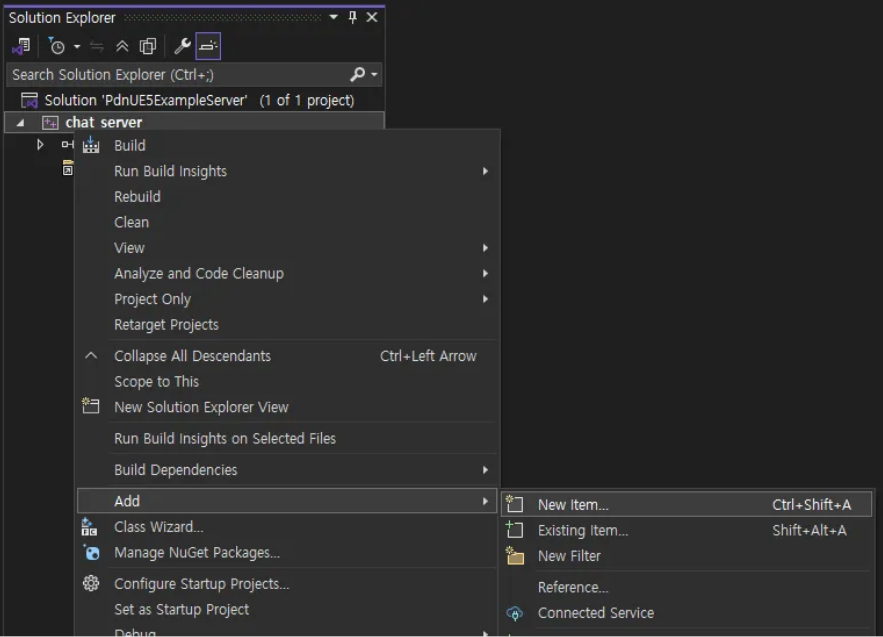
Adding Project Files
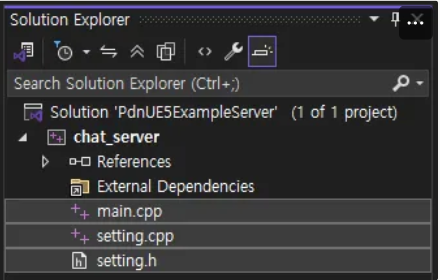
Project Structure
- Modify the properties of the chat_server project.
- "C/C++ - Language - C++ Language Standard"
- Select "ISO C++20 Standard (/std:C++20)" from the dropdown
- "C/C++ - General - Additional Include Directories"
- Select <Edit…> from the dropdown
- Add the following path in the popup window
C:\Program Files (x86)\Nettention\ProudNet\include
- "Linker - General - Additional Library Directories"
- Select <Edit…> from the dropdown
- Add the following path in the popup window
C:\Program Files (x86)\Nettention\ProudNet\lib\$(Platform)\v140\$(Configuration)
- "Linker - Input - Additional Dependencies"
- Select <Edit…> from the dropdown
- Add the following filenames in the popup window
ProudNetServer.lib
ProudNetClient.lib
- "Build Events - Post-Build Event - Command Line"
- Select <Edit…> from the dropdown
- Add the following commands in the popup window
xcopy /Y "C:\Program Files (x86)\Nettention\ProudNet\lib\$(Platform)\v140\$(Configuration)\libcrypto-3-x64.dll" "$(OutDir)"
xcopy /Y "C:\Program Files (x86)\Nettention\ProudNet\lib\$(Platform)\v140\$(Configuration)\libssl-3-x64.dll" "$(OutDir)"
- "C/C++ - Language - C++ Language Standard"
- Enter code into each source file.
- setting.h (diff)
+ #pragma once + + namespace ProudSetting + { + namespace CHAT + { + extern const ::Proud::Guid version; + extern const int server_port; + } + } - setting.cpp (diff)
+ #include <ProudNetClient.h> + #include "setting.h" + + namespace ProudSetting + { + namespace CHAT + { + const ::Proud::PNGUID guid = { 0x3ae33249, 0xecc6, 0x4980, { 0xbc, 0x5d, 0x7b, 0xa, 0x99, 0x9c, 0x7, 0x39 } }; + const ::Proud::Guid version = ::Proud::Guid(guid); + const int server_port = 33337; + } + } - main.cpp (diff)
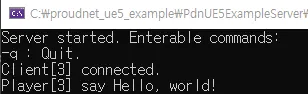
+ #include <iostream>
+ #include <format>
+ #include <memory>
+
+ #include <ProudNetServer.h>
+ #include "setting.h"
+
+ std::shared_ptr<Proud::CNetServer> net_server;
+
+ int main()
+ {
+ 	net_server = std::shared_ptr<Proud::CNetServer>(Proud::CNetServer::Create());
+
+ 	net_server->OnClientJoin = [](Proud::CNetClientInfo* clientInfo)
+ 		{
+ 			std::cout << "Client[" << (int)clientInfo->m_HostID << "] connected.\n";
+ 		};
+ 	net_server->OnClientLeave = [](Proud::CNetClientInfo* clientInfo, Proud::ErrorInfo* error, const Proud::ByteArray byte_arr)
+ 		{
+ 			std::cout << "Client[" << (int)clientInfo->m_HostID << "] disconnected.\n";
+ 		};
+
+ 	Proud::CStartServerParameter start_param;
+ 	start_param.m_protocolVersion = ProudSetting::CHAT::version;
+ 	start_param.m_tcpPorts.Add(ProudSetting::CHAT::server_port);
+
+ 	try
+ 	{
+ 		net_server->Start(start_param);
+ 	}
+ 	catch (Proud::Exception& error)
+ 	{
+ 		std::cout << "Server start failed: " << error.what() << endl;
+ 		return 0;
+ 	}
+
+ 	std::cout << ("Server started. Enterable commands:\n");
+ 	std::cout << ("-q : Quit.\n");
+ 	std::string input;
+ 	while (true)
+ 	{
+ 		std::cin >> input;
+ 		if (input[0] == '-')
+ 		{
+ 			if (input == "-q")
+ 				break;
+ 		}
+ 	}
+
+ 	std::cout << "Stopping server...\n";
+ 	net_server->Stop();
+ 	net_server = nullptr;
+ 	std::cout << "Server stopped.\n";
+ 	return 0;
+ }
Complete Code
- setting.h
#pragma once namespace ProudSetting { namespace CHAT { extern const ::Proud::Guid version; extern const int server_port; } } - setting.cpp
#include <ProudNetClient.h> #include "setting.h" namespace ProudSetting { namespace CHAT { const ::Proud::PNGUID guid = { 0x3ae33249, 0xecc6, 0x4980, { 0xbc, 0x5d, 0x7b, 0xa, 0x99, 0x9c, 0x7, 0x39 } }; const ::Proud::Guid version = ::Proud::Guid(guid); const int server_port = 33337; } } - main.cpp
#include <iostream>
#include <format>
#include <memory>

#include <ProudNetServer.h>
#include "setting.h"

std::shared_ptr<Proud::CNetServer> net_server;

int main()
{
	net_server = std::shared_ptr<Proud::CNetServer>(Proud::CNetServer::Create());

	net_server->OnClientJoin = [](Proud::CNetClientInfo* clientInfo)
		{
			std::cout << "Client[" << (int)clientInfo->m_HostID << "] connected.\n";
		};
	net_server->OnClientLeave = [](Proud::CNetClientInfo* clientInfo, Proud::ErrorInfo* error, const Proud::ByteArray byte_arr)
		{
			std::cout << "Client[" << (int)clientInfo->m_HostID << "] disconnected.\n";
		};

	Proud::CStartServerParameter start_param;
	start_param.m_protocolVersion = ProudSetting::CHAT::version;
	start_param.m_tcpPorts.Add(ProudSetting::CHAT::server_port);

	try
	{
		net_server->Start(start_param);
	}
	catch (Proud::Exception& error)
	{
		std::cout << "Server start failed: " << error.what() << endl;
		return 0;
	}

	std::cout << ("Server started. Enterable commands:\n");
	std::cout << ("-q : Quit.\n");
	std::string input;
	while (true)
	{
		std::cin >> input;
		if (input[0] == '-')
		{
			if (input == "-q")
				break;
		}
	}

	std::cout << "Stopping server...\n";
	net_server->Stop();
	net_server = nullptr;
	std::cout << "Server stopped.\n";
	return 0;
}
- setting.h (diff)
- Build and run the project (F5) to see the following screen.
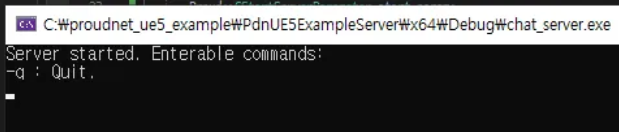
Server Running Screen
1.3. Unreal Engine Project Configuration
- Add Infima Games' Free FPS Template to your library.
- Create a template project following the procedure below.
- Launch Epic Games Launcher
- Navigate to the Unreal Engine tab
- Navigate to the Library tab
- Click "Create Project" for "Free FPS Template & Tutorial" in the Fab library list
- Change the name and folder, then click Create
- This guide uses the following name and path.
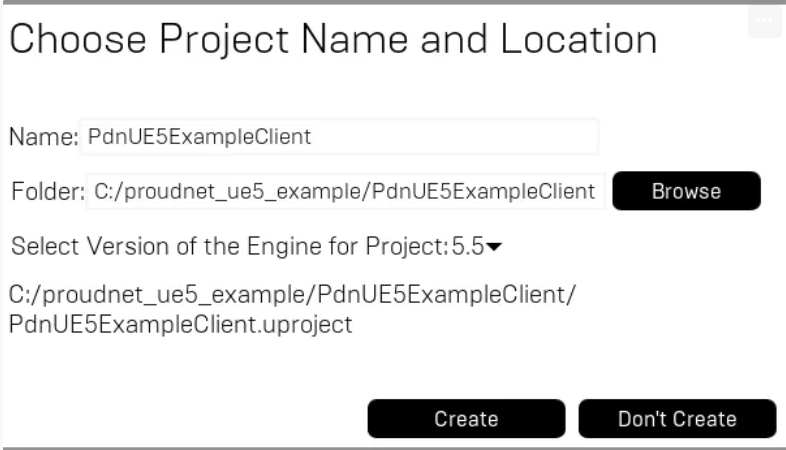
Unreal Project Creation
- Create a C++ class following the procedure below.
- Top Toolbar - Tools - New C++ Class
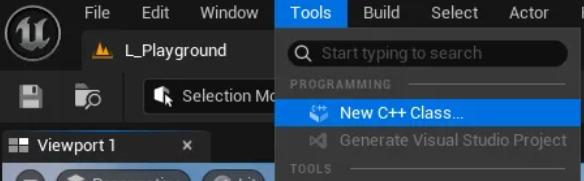
C++ Class Creation Menu
- Show All Classes, then select GameInstanceSubsystem
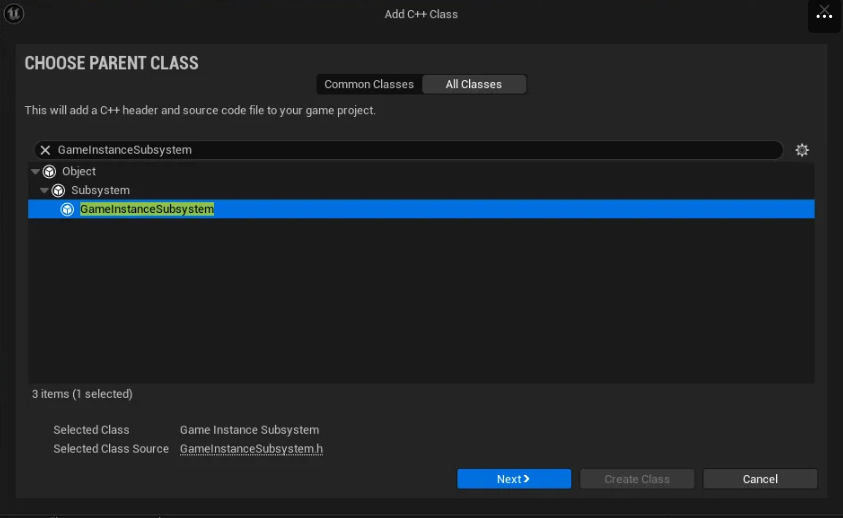
GameInstanceSubsystem Selection
- Class Type - Select Public and enter class name, then create class
- This guide uses GissChatNet.
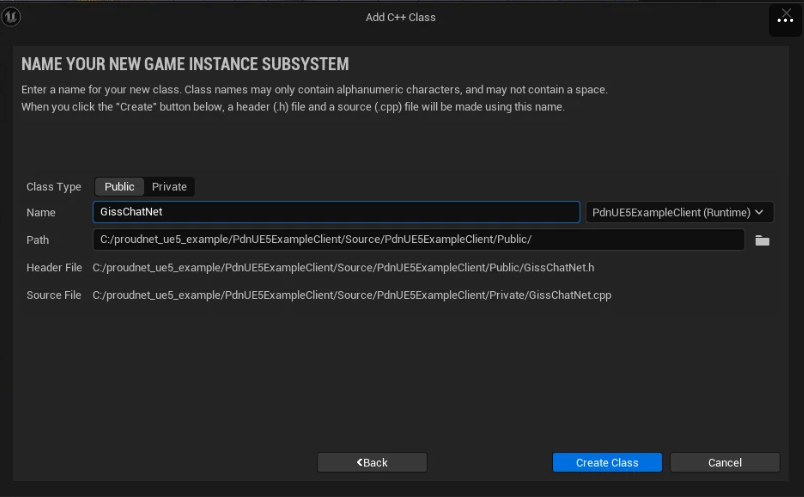
Enter Class Name
- This guide uses GissChatNet.
- Top Toolbar - Tools - New C++ Class
- Generate the VS solution for the Unreal project following the procedure below.
- Close the Unreal Engine editor.
- Navigate to the Unreal project folder.
- Right-click PdnUE5ExampleClient.uproject and select Generate Visual Studio project files
- Change the startup project (recommended)
- Guide image
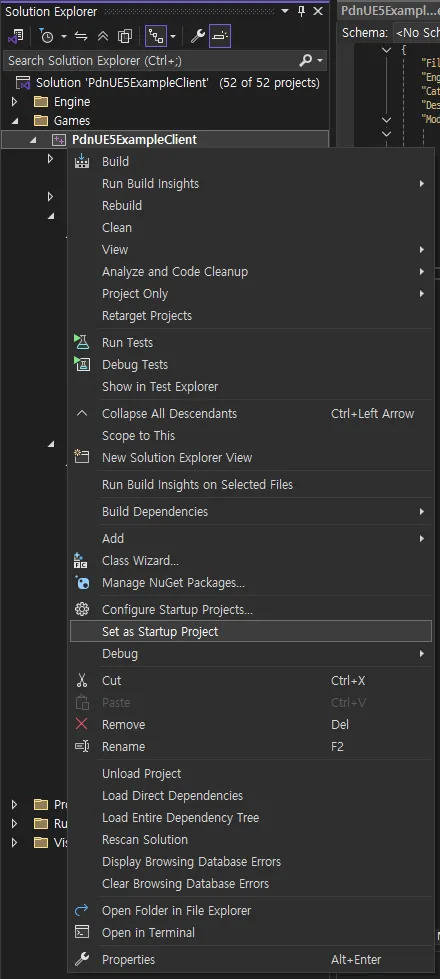
Change Startup Project
- Apply the UE5 ProudNet plugin following the procedure below.
- Open the Unreal project folder.
Shortcut: Epic Games Launcher → My Projects → Right-click project → Show in Folder
- Extract the following file and place it in the Plugins folder.
Create a new Plugins folder if it doesn't exist.
ProudNet UE5 Lib Linker Plugin.zip

Plugin Folder Structure
- Regenerate the Visual Studio project solution.
- Close the Visual Studio IDE.
- Right-click PdnUE5ExampleClient.uproject and select Generate Visual Studio project files
- Modify the PdnUE5ExampleClient.Build.cs code.
- Guide image
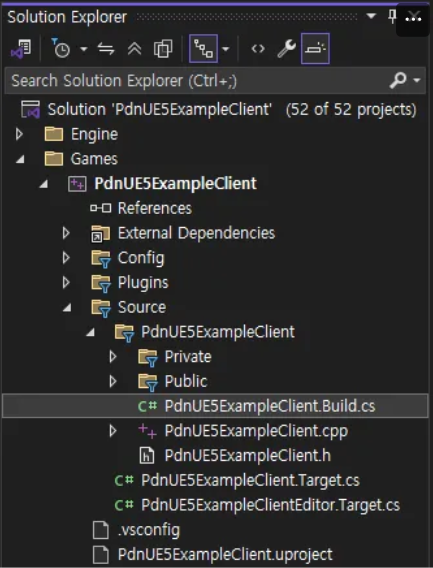
Build.cs File Location
- Modifications
// Fill out your copyright notice in the Description page of Project Settings. using UnrealBuildTool; public class PdnUE5ExampleClient : ModuleRules { public PdnUE5ExampleClient(ReadOnlyTargetRules Target) : base(Target) { PCHUsage = PCHUsageMode.UseExplicitOrSharedPCHs; - PublicDependencyModuleNames.AddRange(new string[] { "Core", "CoreUObject", "Engine", "InputCore" }); + PublicDependencyModuleNames.AddRange(new string[] { "Core", "CoreUObject", "Engine", "InputCore", "ProudNet" }); PrivateDependencyModuleNames.AddRange(new string[] { }); // Uncomment if you are using Slate UI // PrivateDependencyModuleNames.AddRange(new string[] { "Slate", "SlateCore" }); // Uncomment if you are using online features // PrivateDependencyModuleNames.Add("OnlineSubsystem"); // To include OnlineSubsystemSteam, add it to the plugins section in your uproject file with the Enabled attribute set to true } } - Complete Code
// Fill out your copyright notice in the Description page of Project Settings.

using UnrealBuildTool;

public class PdnUE5ExampleClient : ModuleRules
{
	public PdnUE5ExampleClient(ReadOnlyTargetRules Target) : base(Target)
	{
		PCHUsage = PCHUsageMode.UseExplicitOrSharedPCHs;

		PublicDependencyModuleNames.AddRange(new string[] { "Core", "CoreUObject", "Engine", "InputCore", "ProudNet" });

		PrivateDependencyModuleNames.AddRange(new string[] {  });

		// Uncomment if you are using Slate UI
		// PrivateDependencyModuleNames.AddRange(new string[] { "Slate", "SlateCore" });

		// Uncomment if you are using online features
		// PrivateDependencyModuleNames.Add("OnlineSubsystem");

		// To include OnlineSubsystemSteam, add it to the plugins section in your uproject file with the Enabled attribute set to true
	}
}
- Guide image
- Open the Unreal project folder.
- Modify the GissChatNet.h and .cpp code.
- Guide image
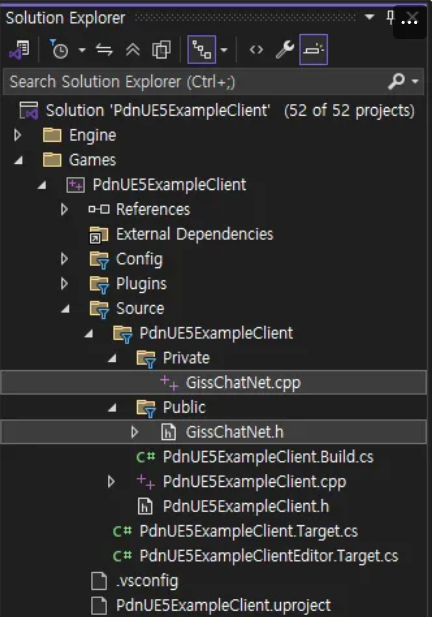
GissChatNet Files
- GissChatNet.h (diff)
// Fill out your copyright notice in the Description page of Project Settings. #pragma once #include "CoreMinimal.h" #include "Subsystems/GameInstanceSubsystem.h" #include "GissChatNet.generated.h" /** * */ UCLASS() class PDNUE5EXAMPLECLIENT_API UGissChatNet : public UGameInstanceSubsystem { GENERATED_BODY() + private: + virtual void Initialize(FSubsystemCollectionBase& Collection) override; + virtual void Deinitialize() override; }; - GissChatNet.cpp (diff)
// Fill out your copyright notice in the Description page of Project Settings. #include "GissChatNet.h" + #include <format> + #include <functional> + + #include <ProudNetClient.h> + #include "C:/proudnet_ue5_example/PdnUE5ExampleServer/chat_server/setting.h" + #include "C:/proudnet_ue5_example/PdnUE5ExampleServer/chat_server/setting.cpp" + + static void LogPrint(const std::string& str) + { + UE_LOG(LogTemp, Log, TEXT("%s"), UTF8_TO_TCHAR(str.c_str())); + } + + static Proud::CriticalSection global_critical_section; + static std::shared_ptr<Proud::CNetClient> net_client; + static FDelegateHandle update_handle; + + void UGissChatNet::Initialize(FSubsystemCollectionBase& Collection) + { + net_client = std::shared_ptr<Proud::CNetClient>(Proud::CNetClient::Create()); + + bool connected = false; + + net_client->OnJoinServerComplete = [&](Proud::ErrorInfo* info, const Proud::ByteArray& replyFromServer) + { + Proud::CriticalSectionLock lock(global_critical_section, true); + + if (info->m_errorType == Proud::ErrorType::Ok) + { + auto log = std::format("Succeed to connect server. Allocated hostID={}\n", (int)net_client->GetLocalHostID()); + LogPrint(log); + + connected = true; + } + else + { + auto log = "Failed to connect to server.\n"; + LogPrint(log); + } + }; + + net_client->OnLeaveServer = [&](Proud::ErrorInfo* errorInfo) + { + Proud::CriticalSectionLock lock(global_critical_section, true); + + auto log = std::format("OnLeaveServer. {} \n", StringT2A(errorInfo->m_comment).GetString()); + LogPrint(log); + + connected = false; + if (update_handle.IsValid()) + { + FCoreDelegates::OnEndFrame.Remove(update_handle); + update_handle.Reset(); + } + }; + + Proud::CNetConnectionParam connection_param; + connection_param.m_protocolVersion = ProudSetting::CHAT::version; + connection_param.m_serverIP = _PNT("localhost"); + connection_param.m_serverPort = ProudSetting::CHAT::server_port; + connection_param.m_closeNoPingPongTcpConnections = false; + + net_client->Connect(connection_param); + + update_handle = FCoreDelegates::OnEndFrame.AddStatic([]() + { + if (net_client) + net_client->FrameMove(); + } + ); + } + + void UGissChatNet::Deinitialize() + { + net_client->Disconnect(); + net_client = nullptr; + } - Complete Code
- GissChatNet.h
// Fill out your copyright notice in the Description page of Project Settings. #pragma once #include "CoreMinimal.h" #include "Subsystems/GameInstanceSubsystem.h" #include "GissChatNet.generated.h" /** * */ UCLASS() class PDNUE5EXAMPLECLIENT_API UGissChatNet : public UGameInstanceSubsystem { GENERATED_BODY() private: virtual void Initialize(FSubsystemCollectionBase& Collection) override; virtual void Deinitialize() override; }; - GissChatNet.cpp
// Fill out your copyright notice in the Description page of Project Settings.

#include "GissChatNet.h"

#include <format>
#include <functional>

#include <ProudNetClient.h>
#include "C:/proudnet_ue5_example/PdnUE5ExampleServer/chat_server/setting.h"
#include "C:/proudnet_ue5_example/PdnUE5ExampleServer/chat_server/setting.cpp"

static void LogPrint(const std::string& str)
{
	UE_LOG(LogTemp, Log, TEXT("%s"), UTF8_TO_TCHAR(str.c_str()));
}

static Proud::CriticalSection global_critical_section;
static std::shared_ptr<Proud::CNetClient> net_client;
static FDelegateHandle update_handle;

void UGissChatNet::Initialize(FSubsystemCollectionBase& Collection)
{
	net_client = std::shared_ptr<Proud::CNetClient>(Proud::CNetClient::Create());

	bool connected = false;

	net_client->OnJoinServerComplete = [&](Proud::ErrorInfo* info, const Proud::ByteArray& replyFromServer)
		{
			Proud::CriticalSectionLock lock(global_critical_section, true);

			if (info->m_errorType == Proud::ErrorType::Ok)
			{
				auto log = std::format("Succeed to connect server. Allocated hostID={}\n", (int)net_client->GetLocalHostID());
				LogPrint(log);

				connected = true;
			}
			else
			{
				auto log = "Failed to connect to server.\n";
				LogPrint(log);
			}
		};

	net_client->OnLeaveServer = [&](Proud::ErrorInfo* errorInfo)
		{
			Proud::CriticalSectionLock lock(global_critical_section, true);

			auto log = std::format("OnLeaveServer. {}  \n", StringT2A(errorInfo->m_comment).GetString());
			LogPrint(log);

			connected = false;
			if (update_handle.IsValid())
			{
				FCoreDelegates::OnEndFrame.Remove(update_handle);
				update_handle.Reset();
			}
		};

	Proud::CNetConnectionParam connection_param;
	connection_param.m_protocolVersion = ProudSetting::CHAT::version;
	connection_param.m_serverIP = _PNT("localhost");
	connection_param.m_serverPort = ProudSetting::CHAT::server_port;
	connection_param.m_closeNoPingPongTcpConnections = false;

	net_client->Connect(connection_param);

	update_handle = FCoreDelegates::OnEndFrame.AddStatic([]()
		{
			if (net_client)
				net_client->FrameMove();
		}
	);
}

void UGissChatNet::Deinitialize()
{
	net_client->Disconnect();
	net_client = nullptr;
}
- GissChatNet.h
- Guide image
- Testing
- Build and run chat_server from PdnUE5ExampleServer.

chat_server Execution
- Build PdnUE5ExampleClient and run the level in the Unreal Engine editor.
Unreal Editor Execution
- Success if client and server connect as shown below.
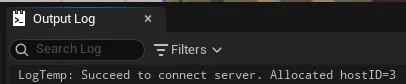
Server Connection Success

Client Connection Success
- Build and run chat_server from PdnUE5ExampleServer.
2. Creating Local Chat
This section covers creating a local chat window and implementing basic chat functionality in Unreal Engine 5.
2.1. Creating Chat Widget
- Create a BP_ChatWidget widget blueprint following the procedure below
- Right-click on an empty area in the Content Browser to open the context menu.
- Select "Create Advanced Asset - User Interface - Widget Blueprint".
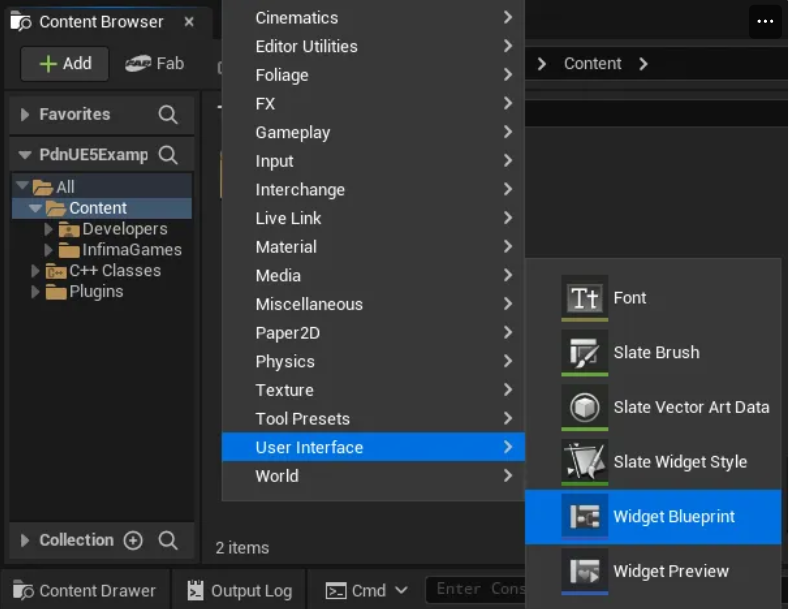
Widget Blueprint Creation
- Select "User Widget"
- Change the name to BP_ChatWidget
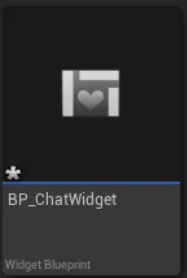
Widget Name Change
- Configure the appearance of the BP_ChatWidget widget following the procedure below.
- Double-click BP_ChatWidget to open the Blueprint editor.
- Configure the widget according to the structure below.
- Widget Element Structure
>> Canvas Panel
	>> Canvas Panel
		- Anchor: Bottom Left
		- Position: [x: 100, y: -200]
		- Size: [x: 640, y: 360]
		- Alignment: [x: 0, y: 1]
		>> Scroll Box
			- Anchor: Top
			- Position: [x: 0, y: 0]
			- Size: [x: 640, y: 300]
			- Alignment: [x: 0.5, y: 0]
		>> Canvas Panel
			- Anchor: Bottom
			- Position: [x: 0, y: 0]
			- Size: [x: 640, y: 48]
			- Alignment: [x: 0.5, y: 1]
			>> Text Box
				- Anchor: Left
				- Position: [x: 0, y: 0]
				- Size: [x: 520, y: 48]
				- Alignment: [x: 0, y: 0.5]
			>> Button
				- Anchor: Right
				- Position: [x: 0, y: 0]
				- Size: [x: 100, y: 48]
				- Alignment: [x: 1, y: 0.5]
				>> Text
					- Text: "Send"
The appearance upon completion of configuration is as follows.
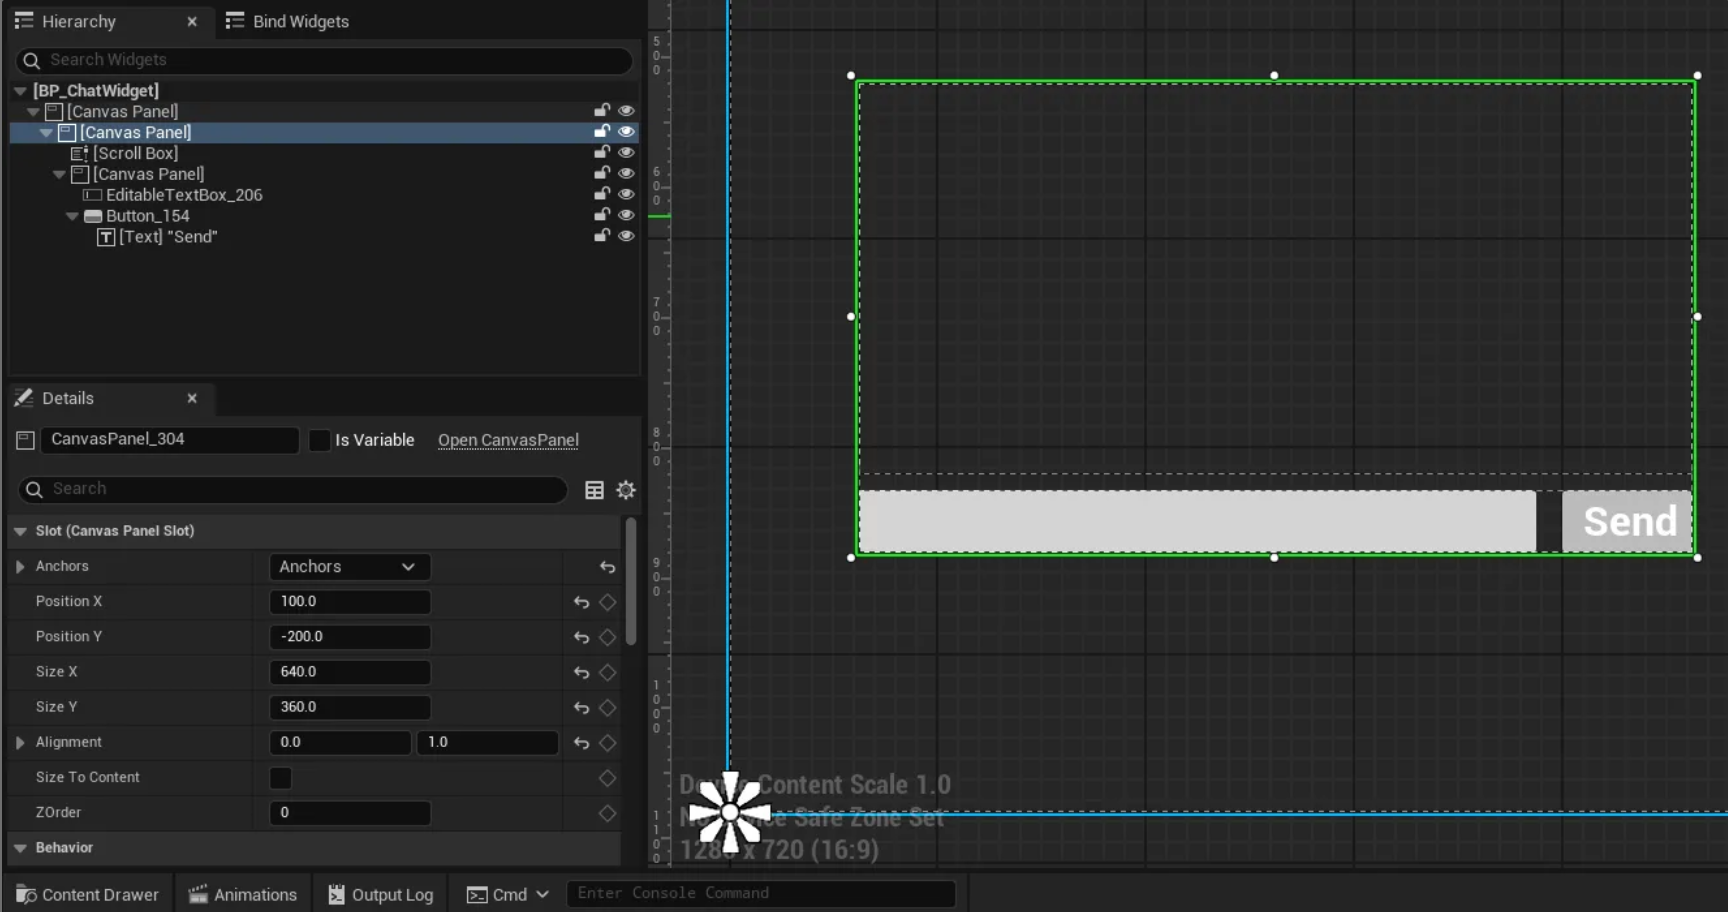
Chat Widget Configuration
- Widget Element Structure
- Add BP_ChatWidget to viewport following the procedure below.
- Open the Level Blueprint editor.
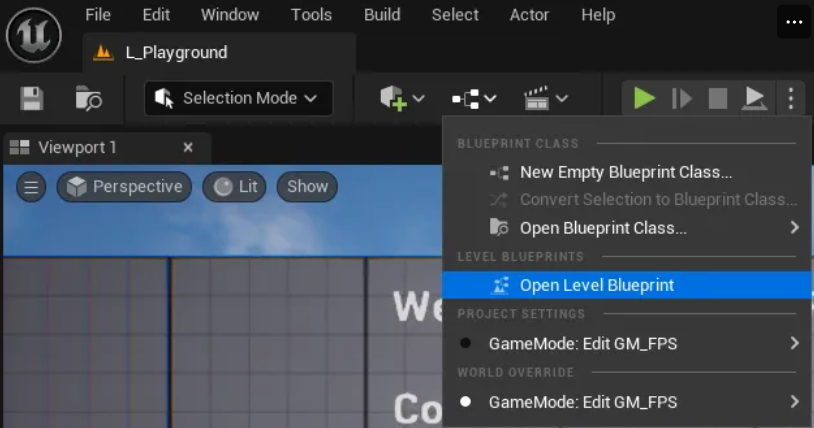
Opening Level Blueprint Editor
- Add Create Widget node and change the class to BP_ChatWidget.
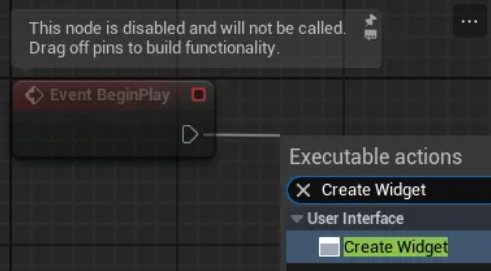
Adding Create Widget Node
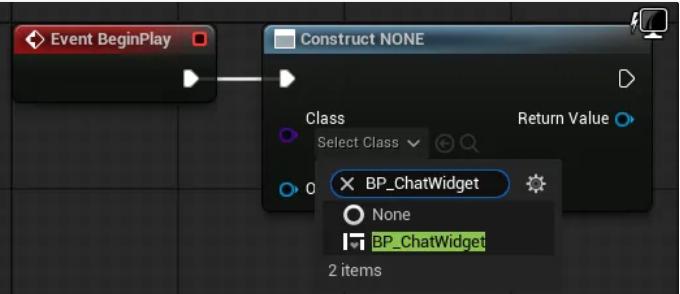
Class Setting
- Add Add to Viewport node and connect them.
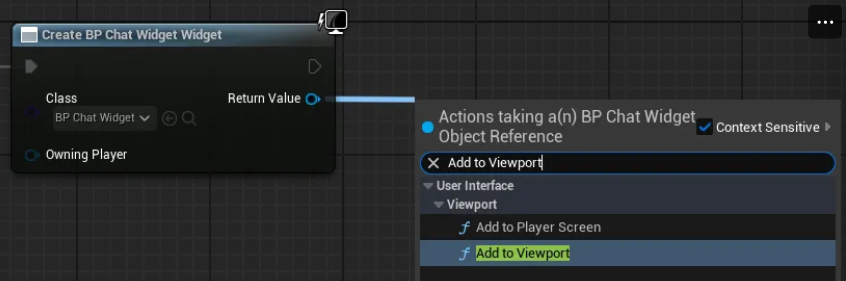
Adding Add to Viewport Node
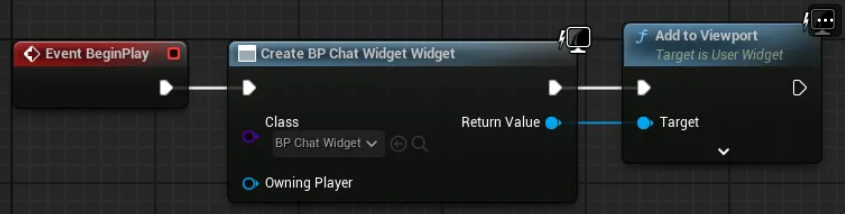
Node Connection
- Open the Level Blueprint editor.
- Run the level and confirm that the chat window has been added.
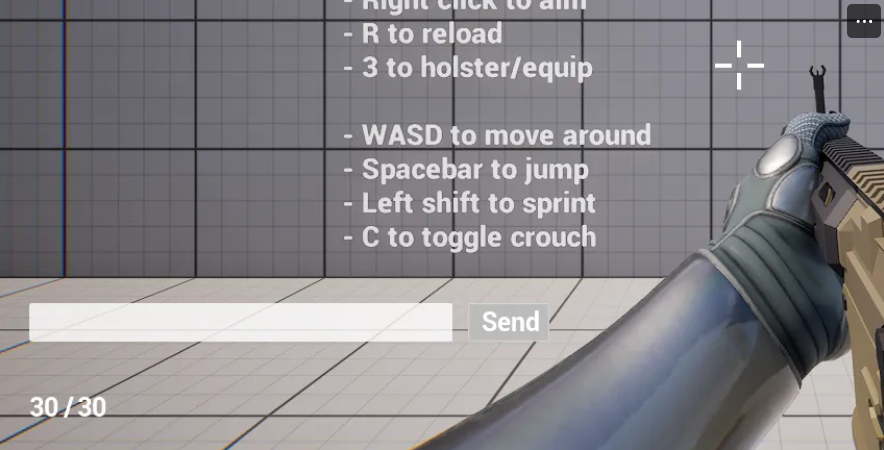
Screen with Chat Window Added
2.2. Implementing Chat Functionality
- Create a new widget blueprint BP_ChatBlock and configure its appearance.
- Configure the widget according to the structure below.
- Widget Element Structure
>> Canvas Panel
	>> Border
		- Anchor: Top Left
		- Position: [x: 0, y: 0]
		- Size: [x: 640, y: 40]
		- Alignment: [x: 0, y: 0]
		- Brush Color: [R: 1, G: 1, B: 1, A: 0.5]
		>> Text
			> Name: ChatText
			> Check Variable
			- Horizontal Alignment: Left
			- Vertical Alignment: Center
			- Font-Size: 20
The appearance upon completion of configuration is as follows.
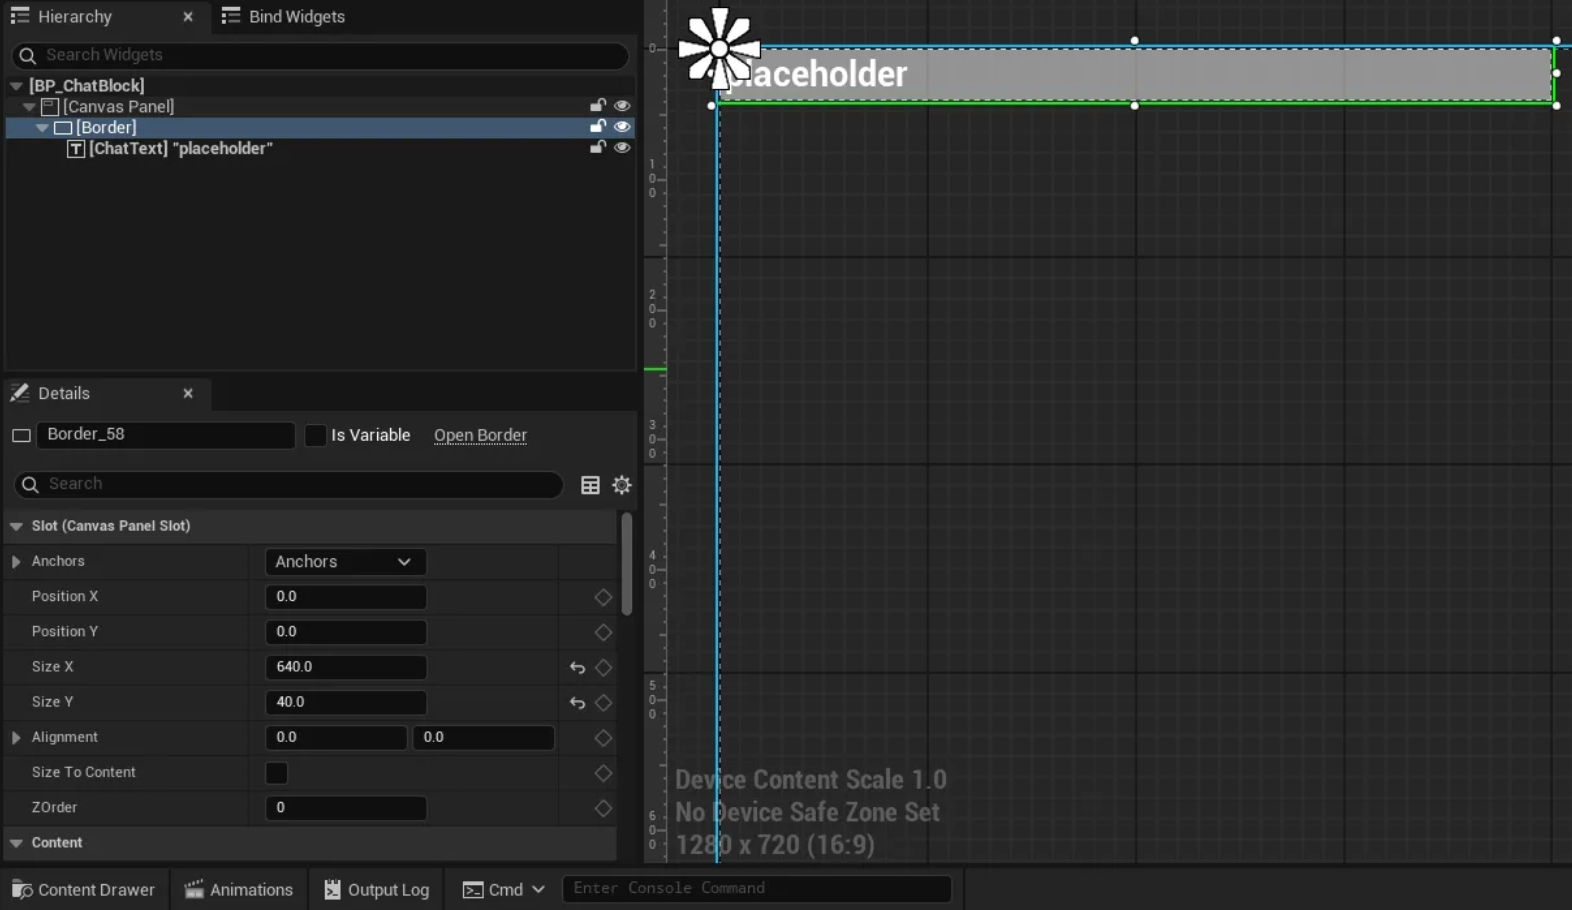
BP_ChatBlock Configuration
- Widget Element Structure
- Configure the widget according to the structure below.
- Configure the Blueprint for BP_ChatBlock widget following the procedure below.
- Switch to Blueprint Graph mode.
Blueprint Graph Mode
- Configure the SetChatText function.
- Create a function in the Blueprint window.

Function Creation
- Set function parameters in the Details window.
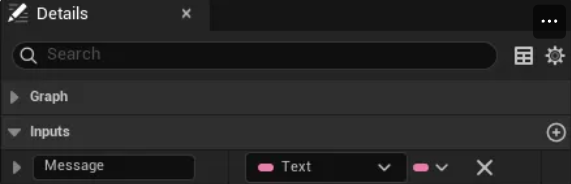
Function Parameter Setting
- Drag ChatText from the variable list in the Blueprint window and select Get ChatText.
- Create and connect SetText (Text) node. Be careful not to accidentally select other items.
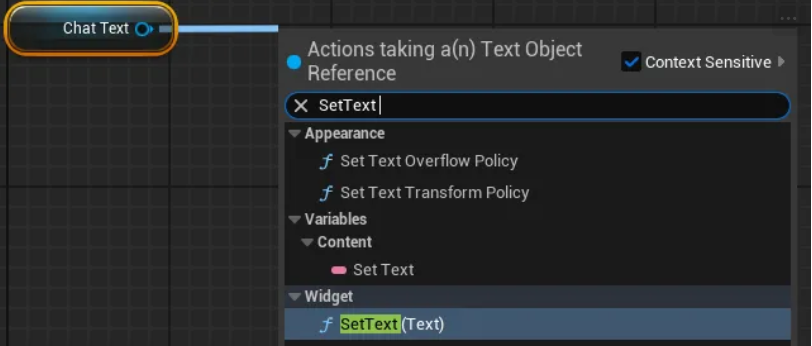
Adding SetText Node
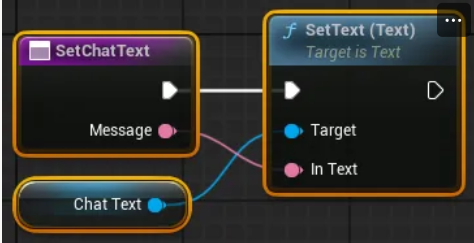
Node Connection Complete
- Create a function in the Blueprint window.
- Switch to Blueprint Graph mode.
- Configure the BP_ChatWidget widget following the procedure below.
- Open the BP_ChatWidget Blueprint editor and switch to Designer mode.
- Modify the widget referring to the following.
- Widget Element Structure
-> Canvas Panel
	-> Canvas Panel
		-> Scroll Box
			> Name: ChatBlockArea
			> Check Variable
		-> Canvas Panel
			-> Button
				> Name: SendButton
				> Check Variable
			-> Text Box
				> Name: ChatTextBox
				> Check Variable
The appearance after modification is as follows.
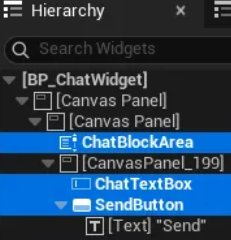
BP_ChatWidget Modification Complete
- Widget Element Structure
- Switch the Blueprint editor to Graph mode.
- Configure the PrintChat function.
- Add a function.
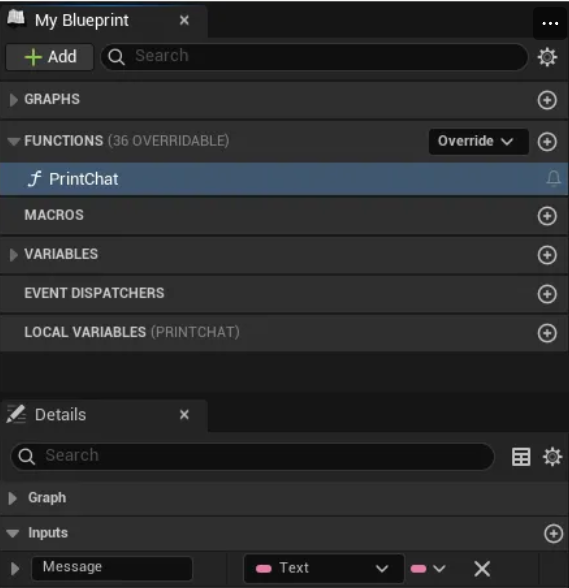
Adding PrintChat Function
- Add Create Widget node and specify BP_ChatBlock for the class.
- Add and connect BP_ChatBlock's SetChatText node.
- Drag and add the ChatBlockArea variable.
- Add Add Child node and connect.
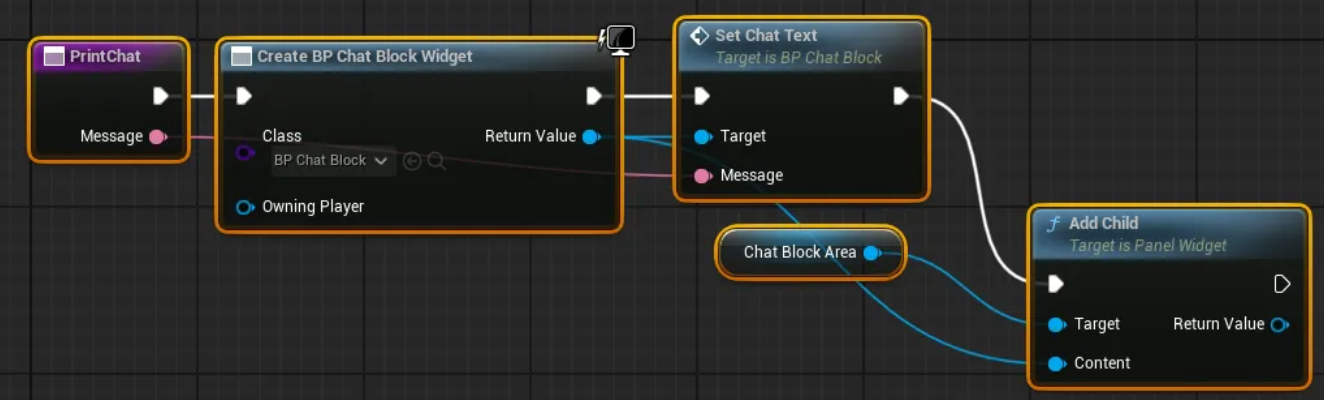
PrintChat Function Configuration
- Add a function.
- Implement the chat message sending event.
- Select SendButton from variables and add a click event.
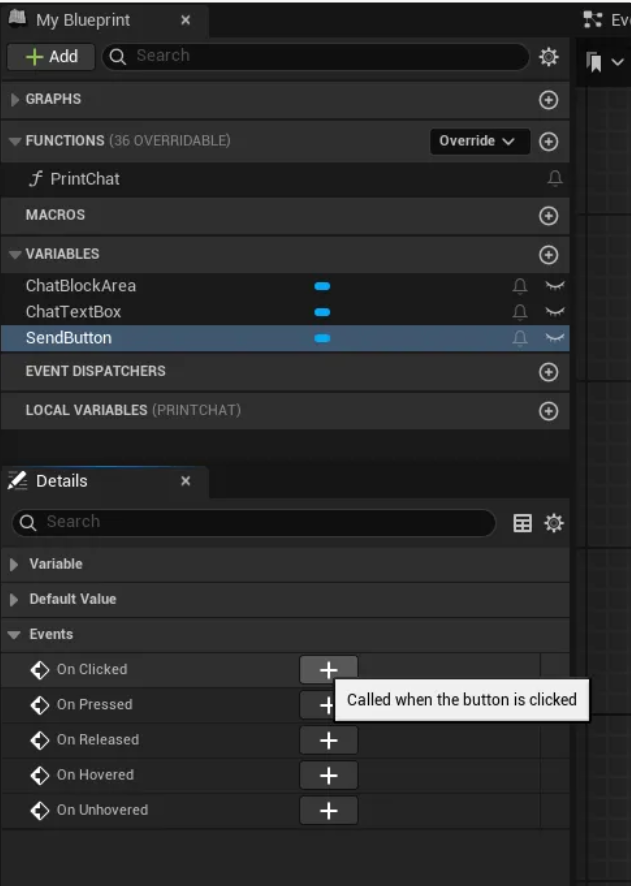
Adding Button Click Event
- Drag and add the ChatTextBox variable and PrintChat function.
- Add Get Text (Text Box) node and connect all.
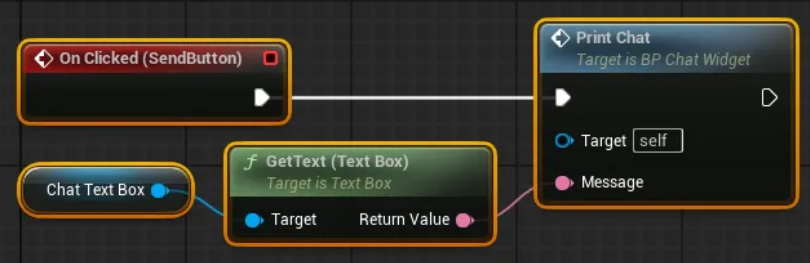
Chat Send Event Complete
- Select SendButton from variables and add a click event.
- Additional features can be implemented by modifying the Blueprint graph as follows (optional).
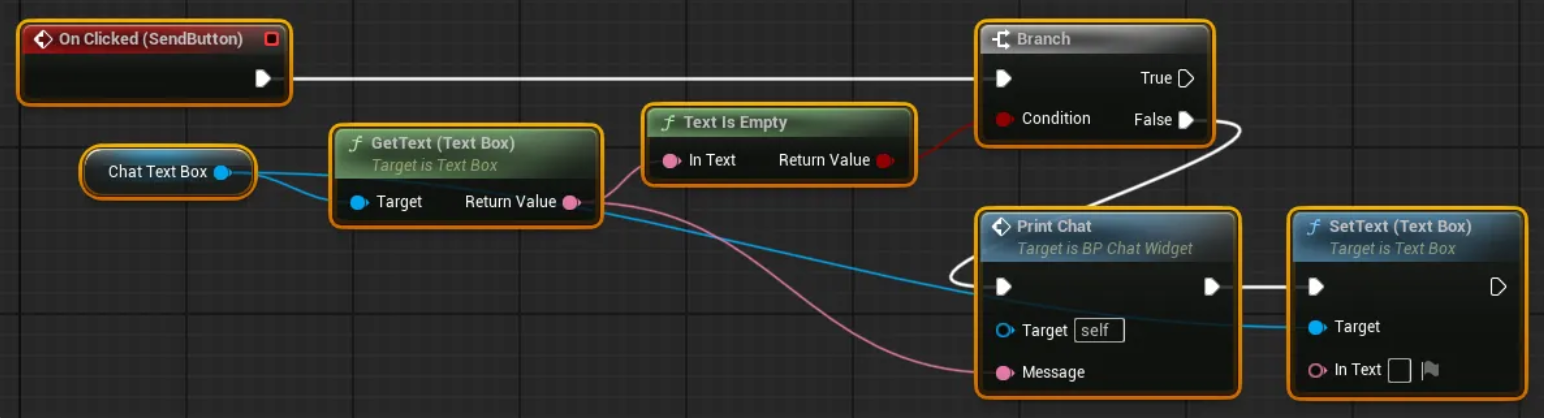
Additional Feature Implementation 1

Additional Feature Implementation 2
- Ignore sending if no message is entered
- Automatically delete the input message after sending
- Auto-scroll chat window to bottom when new chat arrives
- Run the level and confirm that chat functionality has been added.
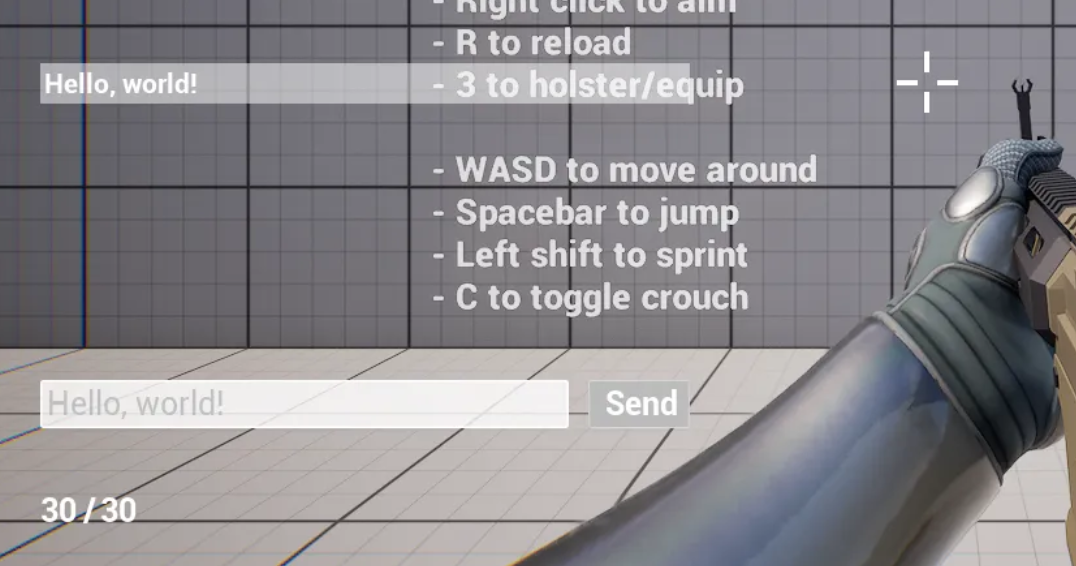
Chat Function Verification
3. Creating Online Chat
This section covers implementing network chat functionality using ProudNet.
3.1. Visual Studio Project Work
- Add a new empty project chat_pidl in PdnUE5ExampleServer.
- Add two files C2S.PIDL, S2C.PIDL and modify their properties.
- Select "Custom Build Tool" from "General - Item Type" dropdown
- Enter text in "Custom Build Tool - General - Command Line"
C:\"Program Files (x86)"\Nettention\ProudNet\util\PIDL.exe "%(FullPath)" -cpp
- Enter text in "Custom Build Tool - General - Description"
%(Filename).PIDL Compiling...
- Select <Edit…> from "Custom Build Tool - General - Outputs" dropdown and add the following paths in the popup window
%(RootDir)%(Directory)\%(Filename)_common.cpp
%(RootDir)%(Directory)\%(Filename)_common.h
%(RootDir)%(Directory)\%(Filename)_proxy.cpp
%(RootDir)%(Directory)\%(Filename)_proxy.h
%(RootDir)%(Directory)\%(Filename)_stub.cpp
%(RootDir)%(Directory)\%(Filename)_stub.h
- Enter code in each file.
- Complete Code
- C2S.PIDL
[access=public] global CHAT_C2S 3000 { Chat([in] Proud::String message); } - S2C.PIDL
[access=public]
global CHAT_S2C 4000
{
    SystemChat([in] Proud::String message);
    BroadcastChat([in] int sender_id, [in] Proud::String message);
}
- C2S.PIDL
- Complete Code
- Build the chat_pidl project. You can check the built source code files in the chat_pidl project folder.
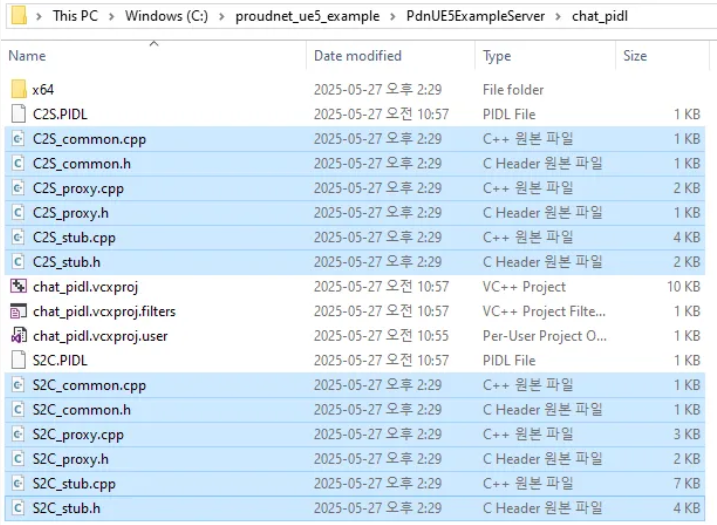
PIDL Build Results
- Modify the main.cpp source code of the chat_server project.
- Modifications
#include <iostream> #include <format> #include <memory> #include <ProudNetServer.h> #include "setting.h" + #include "../chat_pidl/S2C_common.h" + #include "../chat_pidl/S2C_common.cpp" + #include "../chat_pidl/S2C_proxy.h" + #include "../chat_pidl/S2C_proxy.cpp" + + #include "../chat_pidl/C2S_common.h" + #include "../chat_pidl/C2S_common.cpp" + #include "../chat_pidl/C2S_stub.h" + #include "../chat_pidl/C2S_stub.cpp" + + + Proud::HostID group_host_id = Proud::HostID_None; + CHAT_S2C::Proxy s2c_proxy; + + struct CHAT_C2S_Stub : public CHAT_C2S::Stub + { + public: + DECRMI_CHAT_C2S_Chat; + }; + + DEFRMI_CHAT_C2S_Chat(CHAT_C2S_Stub) + { + Proud::RmiContext rmi_context; + rmi_context.m_enableLoopback = false; + s2c_proxy.BroadcastChat(group_host_id, rmi_context, (int)remote, message); + std::cout << std::format("Player[{}] say {}\n", (int)remote, StringT2A(message).GetString()); + return true; + } + + CHAT_C2S_Stub c2s_stub; std::shared_ptr<Proud::CNetServer> net_server; int main() { net_server = std::shared_ptr<Proud::CNetServer>(Proud::CNetServer::Create()); net_server->OnClientJoin = [](Proud::CNetClientInfo* clientInfo) { std::cout << "Client[" << (int)clientInfo->m_HostID << "] connected.\n"; + + Proud::HostID list[100]; + int listCount = net_server->GetClientHostIDs(list, 100); + group_host_id = net_server->CreateP2PGroup(list, listCount, Proud::ByteArray()); + + auto message = std::format("Player[{}] has joined.", (int)clientInfo->m_HostID); + Proud::RmiContext rmi_context; + s2c_proxy.SystemChat(group_host_id, rmi_context, message); }; net_server->OnClientLeave = [](Proud::CNetClientInfo* clientInfo, Proud::ErrorInfo* error, const Proud::ByteArray byte_arr) { std::cout << "Client[" << (int)clientInfo->m_HostID << "] disconnected.\n"; + + auto message = std::format("Player[{}] has left the game.", (int)clientInfo->m_HostID); + Proud::RmiContext rmi_context; + s2c_proxy.SystemChat(group_host_id, rmi_context, message); }; + net_server->AttachProxy(&s2c_proxy); + net_server->AttachStub(&c2s_stub); + Proud::CStartServerParameter start_param; start_param.m_protocolVersion = ProudSetting::CHAT::version; start_param.m_tcpPorts.Add(ProudSetting::CHAT::server_port); try { net_server->Start(start_param); } catch (Proud::Exception& error) { std::cout << "Server start failed: " << error.what() << endl; return 0; } std::cout << ("Server started. Enterable commands:\n"); std::cout << ("-q : Quit.\n"); std::string input; while (true) { std::cin >> input; if (input[0] == '-') { if (input == "-q") break; } + else + { + Proud::RmiContext rmi_context; + s2c_proxy.SystemChat(group_host_id, rmi_context, input); + } } std::cout << "Stopping server...\n"; net_server->Stop(); net_server = nullptr; std::cout << "Server stopped.\n"; return 0; } - Complete Code
- main.cpp
#include <iostream>
#include <format>
#include <memory>

#include <ProudNetServer.h>
#include "setting.h"

#include "../chat_pidl/S2C_common.h"
#include "../chat_pidl/S2C_common.cpp"
#include "../chat_pidl/S2C_proxy.h"
#include "../chat_pidl/S2C_proxy.cpp"

#include "../chat_pidl/C2S_common.h"
#include "../chat_pidl/C2S_common.cpp"
#include "../chat_pidl/C2S_stub.h"
#include "../chat_pidl/C2S_stub.cpp"

Proud::HostID group_host_id = Proud::HostID_None;
CHAT_S2C::Proxy s2c_proxy;

struct CHAT_C2S_Stub : public CHAT_C2S::Stub
{
public:
	DECRMI_CHAT_C2S_Chat;
};

DEFRMI_CHAT_C2S_Chat(CHAT_C2S_Stub)
{
	Proud::RmiContext rmi_context;
	rmi_context.m_enableLoopback = false;
	s2c_proxy.BroadcastChat(group_host_id, rmi_context, (int)remote, message);
	std::cout << std::format("Player[{}] say {}\n", (int)remote, StringT2A(message).GetString());
	return true;
}

CHAT_C2S_Stub c2s_stub;
std::shared_ptr<Proud::CNetServer> net_server;

int main()
{
	net_server = std::shared_ptr<Proud::CNetServer>(Proud::CNetServer::Create());

	net_server->OnClientJoin = [](Proud::CNetClientInfo* clientInfo)
		{
			std::cout << "Client[" << (int)clientInfo->m_HostID << "] connected.\n";

			Proud::HostID list[100];
			int listCount = net_server->GetClientHostIDs(list, 100);
			group_host_id = net_server->CreateP2PGroup(list, listCount, Proud::ByteArray());

			auto message = std::format("Player[{}] has joined.", (int)clientInfo->m_HostID);
			Proud::RmiContext rmi_context;
			s2c_proxy.SystemChat(group_host_id, rmi_context, message);
		};
	net_server->OnClientLeave = [](Proud::CNetClientInfo* clientInfo, Proud::ErrorInfo* error, const Proud::ByteArray byte_arr)
		{
			std::cout << "Client[" << (int)clientInfo->m_HostID << "] disconnected.\n";

			auto message = std::format("Player[{}] has left the game.", (int)clientInfo->m_HostID);
			Proud::RmiContext rmi_context;
			s2c_proxy.SystemChat(group_host_id, rmi_context, message);
		};

	net_server->AttachProxy(&s2c_proxy);
	net_server->AttachStub(&c2s_stub);

	Proud::CStartServerParameter start_param;
	start_param.m_protocolVersion = ProudSetting::CHAT::version;
	start_param.m_tcpPorts.Add(ProudSetting::CHAT::server_port);

	try
	{
		net_server->Start(start_param);
	}
	catch (Proud::Exception& error)
	{
		std::cout << "Server start failed: " << error.what() << endl;
		return 0;
	}

	std::cout << ("Server started. Enterable commands:\n");
	std::cout << ("-q : Quit.\n");
	std::string input;
	while (true)
	{
		std::cin >> input;
		if (input[0] == '-')
		{
			if (input == "-q")
				break;
		}
		else
		{
			Proud::RmiContext rmi_context;
			s2c_proxy.SystemChat(group_host_id, rmi_context, input);
		}
	}

	std::cout << "Stopping server...\n";
	net_server->Stop();
	net_server = nullptr;
	std::cout << "Server stopped.\n";
	return 0;
}
- main.cpp
- Modifications
3.2. Unreal Project Work
- Create a C++ class BaseChatWidget that inherits from UserWidget in the Unreal Engine editor.
- Modify the source code of the created BaseChatWidget class.
- Modifications
- BaseChatWidget.h
// Fill out your copyright notice in the Description page of Project Settings.

#pragma once

#include "CoreMinimal.h"
#include "Blueprint/UserWidget.h"
#include "BaseChatWidget.generated.h"

/**
 *
 */
UCLASS()
class PDNUE5EXAMPLECLIENT_API UBaseChatWidget : public UUserWidget
{
	GENERATED_BODY()

+ public:
+ 	UFUNCTION(BlueprintImplementableEvent)
+ 	void PrintChat(const FText& message);
};
- BaseChatWidget.h
- Complete Code
- BaseChatWidget.h
// Fill out your copyright notice in the Description page of Project Settings.

#pragma once

#include "CoreMinimal.h"
#include "Blueprint/UserWidget.h"
#include "BaseChatWidget.generated.h"

/**
 *
 */
UCLASS()
class PDNUE5EXAMPLECLIENT_API UBaseChatWidget : public UUserWidget
{
	GENERATED_BODY()

public:
	UFUNCTION(BlueprintImplementableEvent)
	void PrintChat(const FText& message);
};
- BaseChatWidget.h
- Modifications
- Modify the source code of the GissChatNet class.
- Modifications (showing main parts only)
- GissChatNet.h
// Fill out your copyright notice in the Description page of Project Settings. #pragma once #include "CoreMinimal.h" #include "Subsystems/GameInstanceSubsystem.h" #include "GissChatNet.generated.h" /** * */ UCLASS() class PDNUE5EXAMPLECLIENT_API UGissChatNet : public UGameInstanceSubsystem { GENERATED_BODY() + public: + UFUNCTION(BlueprintCallable) + void SendChat(const FText& message); private: virtual void Initialize(FSubsystemCollectionBase& Collection) override; virtual void Deinitialize() override; }; - GissChatNet.cpp (main addition parts)
+ #include "C:/proudnet_ue5_example/PdnUE5ExampleServer/chat_pidl/C2S_common.h"
+ #include "C:/proudnet_ue5_example/PdnUE5ExampleServer/chat_pidl/C2S_common.cpp"
+ #include "C:/proudnet_ue5_example/PdnUE5ExampleServer/chat_pidl/C2S_proxy.h"
+ #include "C:/proudnet_ue5_example/PdnUE5ExampleServer/chat_pidl/C2S_proxy.cpp"
+
+ #include "C:/proudnet_ue5_example/PdnUE5ExampleServer/chat_pidl/S2C_common.h"
+ #include "C:/proudnet_ue5_example/PdnUE5ExampleServer/chat_pidl/S2C_common.cpp"
+ #include "C:/proudnet_ue5_example/PdnUE5ExampleServer/chat_pidl/S2C_stub.h"
+ #include "C:/proudnet_ue5_example/PdnUE5ExampleServer/chat_pidl/S2C_stub.cpp"
+
+ static Proud::HostID pop_group_host_id = Proud::HostID_None;
+ static CHAT_C2S::Proxy c2s_proxy;
+
+ void UGissChatNet::SendChat(const FText& message)
+ {
+ 	Proud::String message_pstr(*message.ToString());
+ 	Proud::RmiContext context;
+ 	context.m_enableLoopback = true;
+ 	c2s_proxy.Chat(Proud::HostID_Server, context, message_pstr);
+ }
- GissChatNet.h
- Modifications (showing main parts only)
- Modify the Blueprint graph of BP_ChatWidget.
- Convert the PrintChat function to an event.
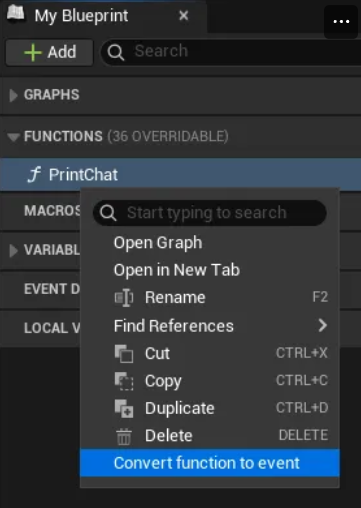
PrintChat Event Conversion
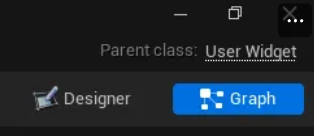
- Change the parent class of BP_ChatWidget to BaseChatWidget.
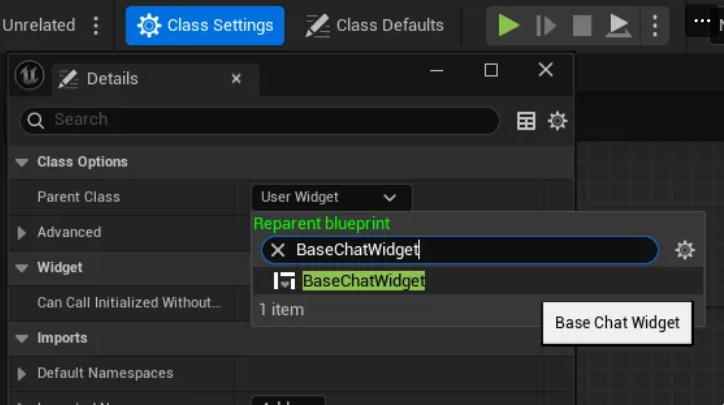
Parent Class Change
- Modify the event graph when SendButton is clicked.
- Add Get GissChatNet node and Send Chat node
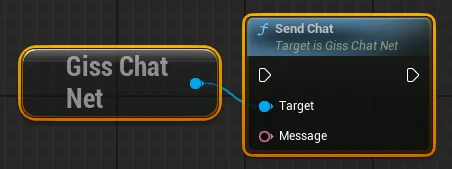
Adding GissChatNet Node
- Replace the existing Print Chat node with Send Chat node.
- Add Get GissChatNet node and Send Chat node
- The final appearance of the BP_ChatWidget Blueprint graph is as follows.
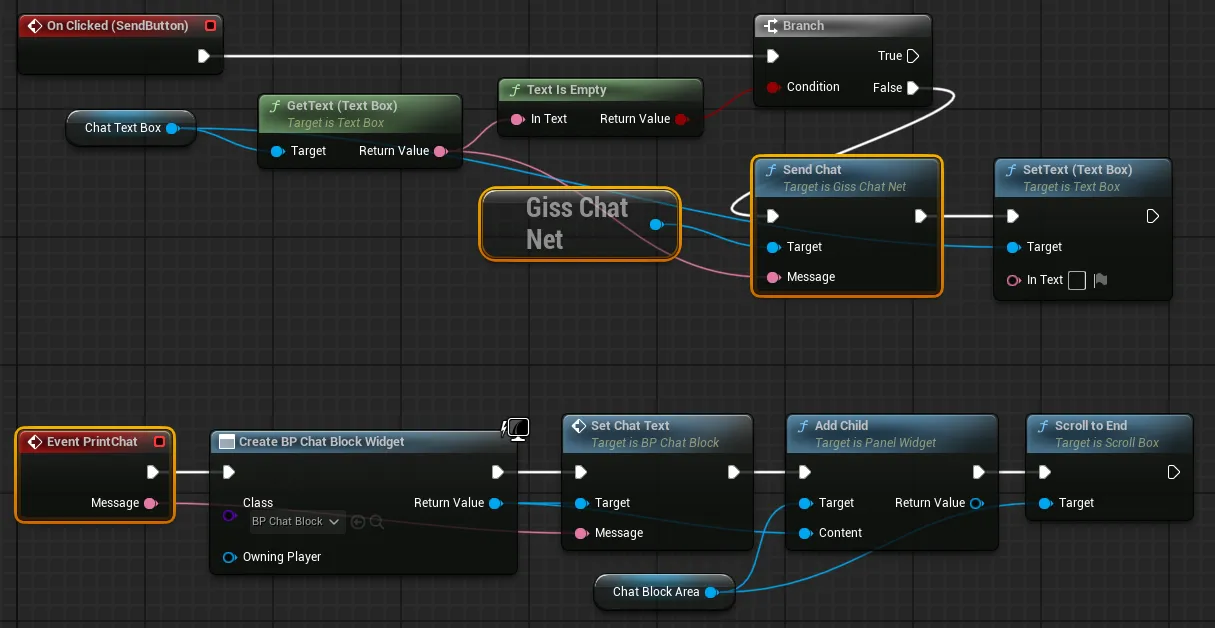
BP_ChatWidget Final Appearance
- Convert the PrintChat function to an event.
3.3. Chat Testing
- Build and run the chat_server project.
- Run the Unreal Engine project level and verify the chat functionality.
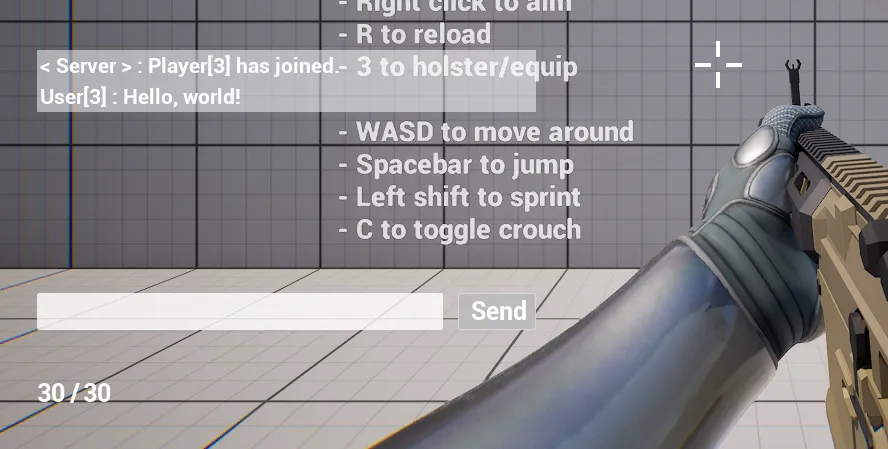
Chat Function Test 1
Chat Function Test 2
4. Implementing Mirage Character
This section covers building a Mirage character with enhanced gameplay features.
4.1. Adding Mirage Blueprint Character
- Duplicate two Blueprint classes.
- Navigate to "All - Content - InfimaGames - FreeFPSTemplate - Core" in the Content Browser.
- Duplicate the two Blueprint classes BP_Character and ABP_Character.
- Rename them to BP_MirageCharacter and ABP_MirageCharacter respectively.
- Open the BP_MirageCharacter Blueprint editor and proceed with the following steps.
- Select CharacterArms in the Components window.
- Change the Anim Class of Animation to ABP_MirageCharacter.
- Set the Skeletal Mesh Asset of the mesh to SKM_Manny_Simple.
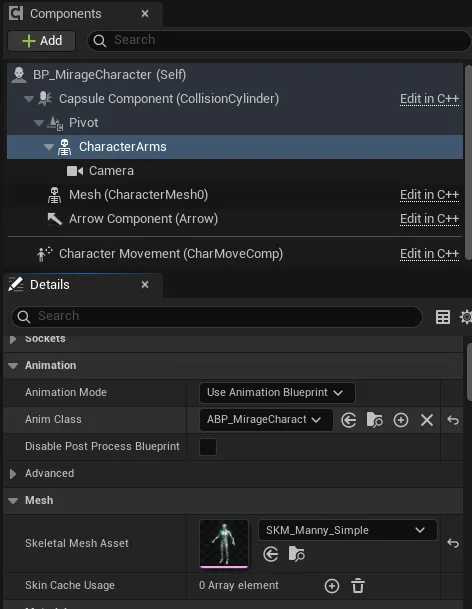
BP_MirageCharacter Configuration
- Place BP_MirageCharacter in the level and run to verify.
If placed as shown below, it is normal based on the current point in time.
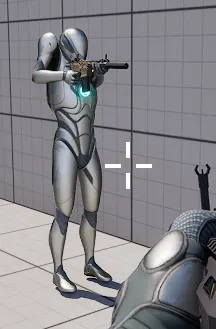
Mirage Character Placement Verification
4.2. Movement Animation Mirroring
4.2.1. Animation Variable Duplication
- Implement the C++ class BaseMirageCharacter.
- Create a BaseMirageCharacter class that inherits from Character
- Modify the source code of the created class.
- Modifications
- BaseMirageCharacter.h
// Fill out your copyright notice in the Description page of Project Settings.

#pragma once

#include "CoreMinimal.h"
#include "GameFramework/Character.h"
#include "BaseMirageCharacter.generated.h"

UCLASS()
class PDNUE5EXAMPLECLIENT_API ABaseMirageCharacter : public ACharacter
{
	GENERATED_BODY()

public:
	// Sets default values for this character's properties
	ABaseMirageCharacter();

protected:
	// Called when the game starts or when spawned
	virtual void BeginPlay() override;

public:
	// Called every frame
	virtual void Tick(float DeltaTime) override;

	// Called to bind functionality to input
	virtual void SetupPlayerInputComponent(class UInputComponent* PlayerInputComponent) override;

+ 	UFUNCTION(BlueprintCallable, BlueprintImplementableEvent)
+ 	void UpdateAnimationParameter(bool aiming, bool closeToWall, bool moving, bool running, float jumpVelocity, FVector3f mouseSwayLocation, FVector3f moveSwayLocation);

};
- BaseMirageCharacter.h
- Complete Code
- BaseMirageCharacter.h
// Fill out your copyright notice in the Description page of Project Settings.

#pragma once

#include "CoreMinimal.h"
#include "GameFramework/Character.h"
#include "BaseMirageCharacter.generated.h"

UCLASS()
class PDNUE5EXAMPLECLIENT_API ABaseMirageCharacter : public ACharacter
{
	GENERATED_BODY()

public:
	// Sets default values for this character's properties
	ABaseMirageCharacter();

protected:
	// Called when the game starts or when spawned
	virtual void BeginPlay() override;

public:
	// Called every frame
	virtual void Tick(float DeltaTime) override;

	// Called to bind functionality to input
	virtual void SetupPlayerInputComponent(class UInputComponent* PlayerInputComponent) override;

	UFUNCTION(BlueprintCallable, BlueprintImplementableEvent)
	void UpdateAnimationParameter(bool aiming, bool closeToWall, bool moving, bool running, float jumpVelocity, FVector3f mouseSwayLocation, FVector3f moveSwayLocation);

};
- BaseMirageCharacter.h
- Modifications
- Set BaseMirageCharacter as the parent class of BP_MirageCharacter
- Implement animation variable duplication using event functions.
- Modify the ABP_Character Blueprint.
- Open the ABP_Character Blueprint editor and navigate to the Event Graph tab.
- Navigate to the end of the BlueprintUpdateAnimation event execution flow.
BlueprintUpdateAnimation Event
- Create and connect a Get Actor Of Class node and specify BP_MirageCharacter for the Class.
- Create and connect an Update Animation Parameter node and connect all variables. All variables can be obtained from the Blueprint's variable list.
Update Animation Parameter Node
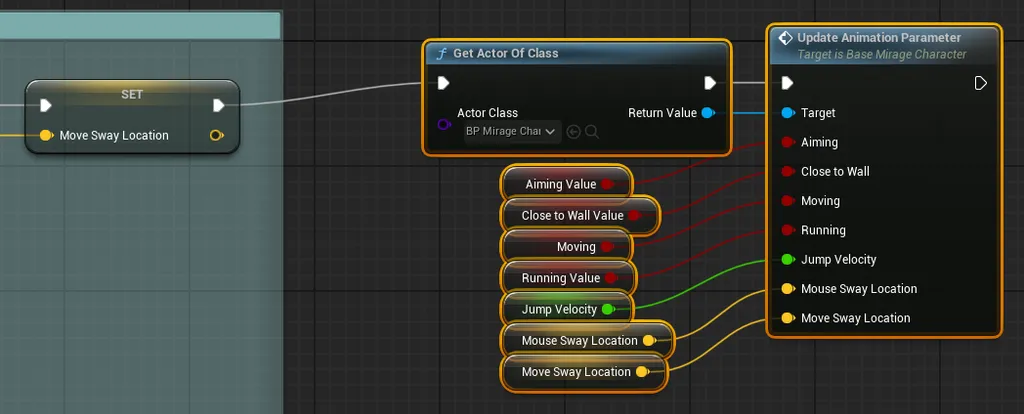
Variable Connection Complete
- Modify the BP_MirageCharacter Blueprint.
- Open the BP_MirageCharacter Blueprint editor and navigate to the Event Graph tab.
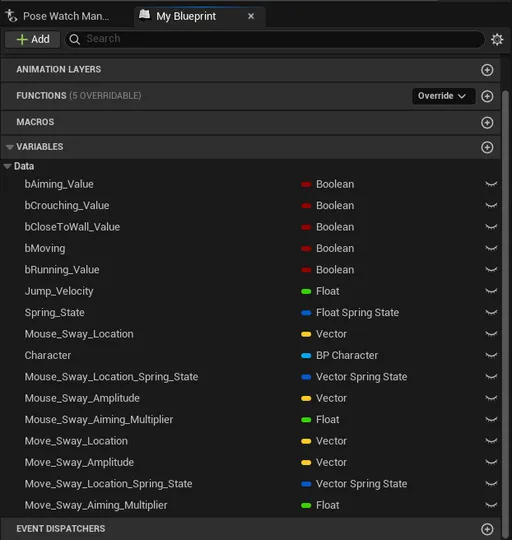
- Add 4 variables.
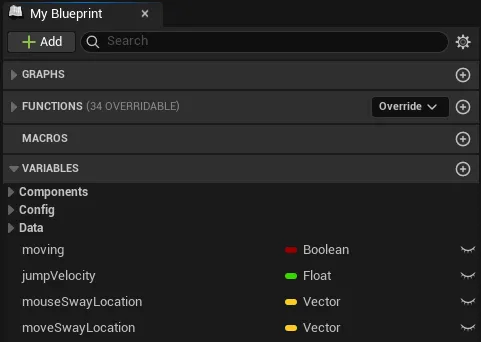
Add Variables
- Add an Event UpdateAnimationParameter node.
- Store the event parameters in Blueprint variables.
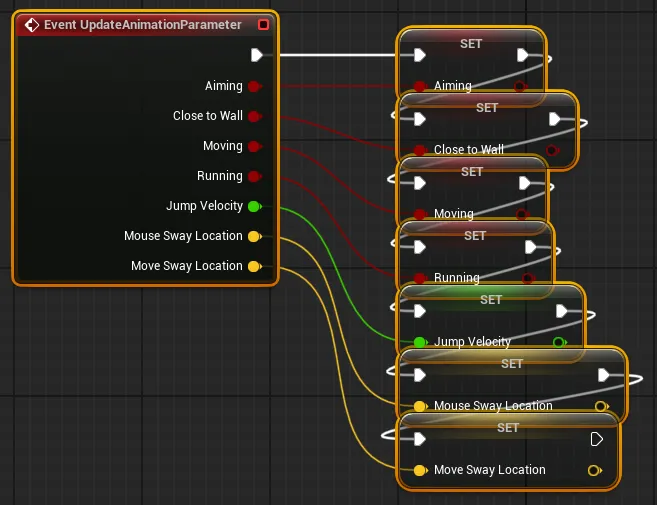
Parameter Storage
- Disconnect the Event Tick node connection.

Event Tick Disconnection
- Modify the ABP_MirageCharacter Blueprint.
- Open the ABP_MirageCharacter Blueprint editor and navigate to the Event Graph tab.
- Add a Try Get Pawn Owner node.
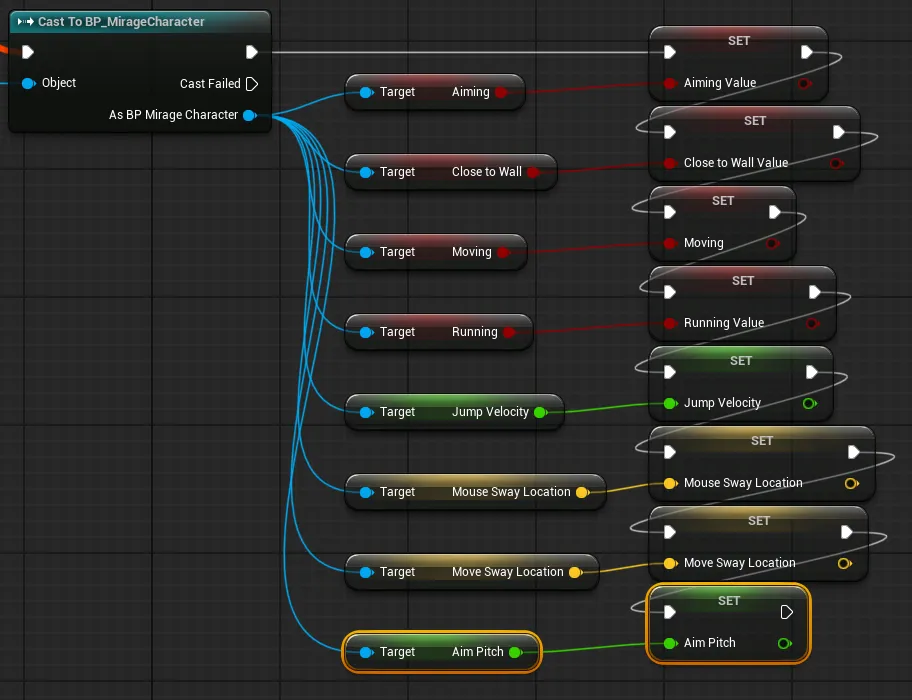
- Add a Cast To BP_MirageCharacter node and connect it.
- Get variables from the cast character and store them in the animation Blueprint variables.
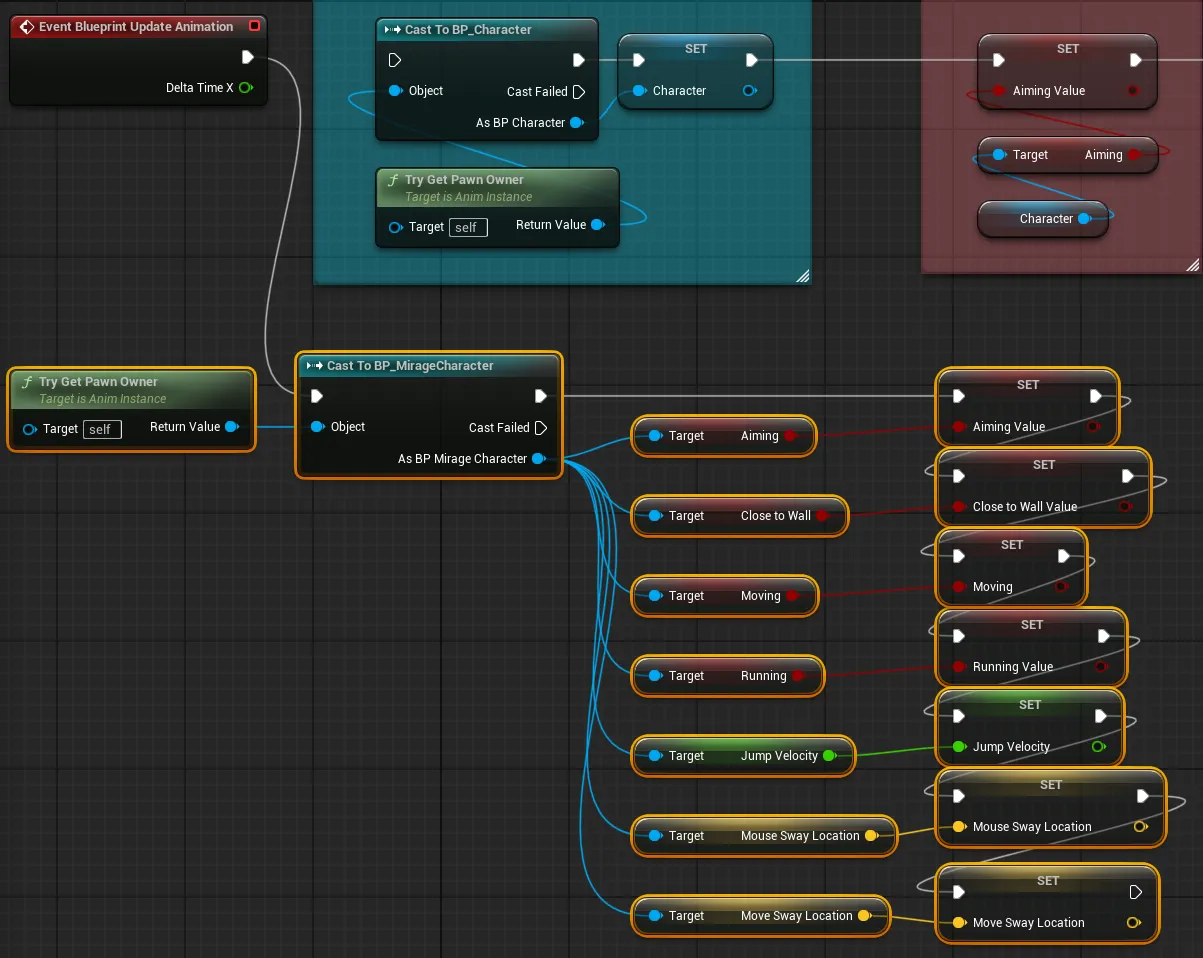
Animation Variable Connection
- Modify the ABP_Character Blueprint.
- Run level and verify animation duplication functionality
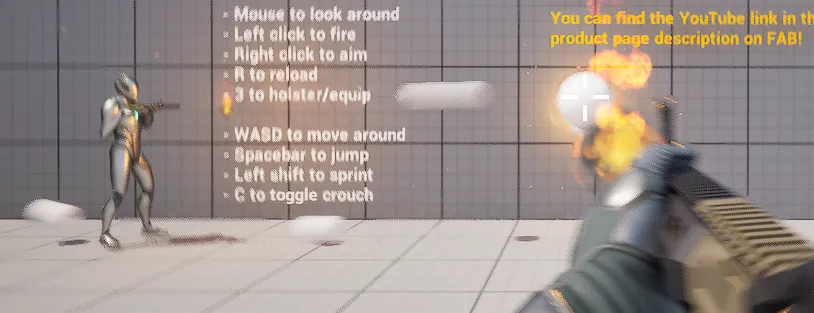
You can observe the mirage character mimicking motions during actions like running, jumping, and aiming.
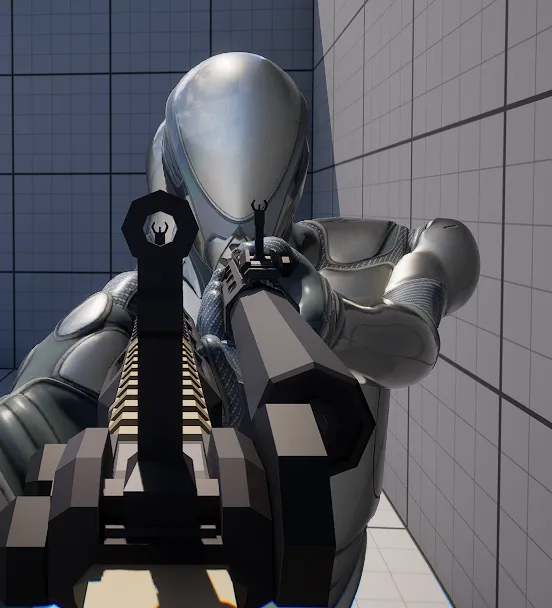
Animation Duplication Verification
4.2.2. Corrective Animation Application
- Prepare corrective animation
- Download the animation file.
Invert.fbx (File download required)
- Drag the downloaded file into the Content Browser of the Unreal Editor.
- Specify SKEL_UE5_Mannequin in the Skeleton field of the Animations tab.
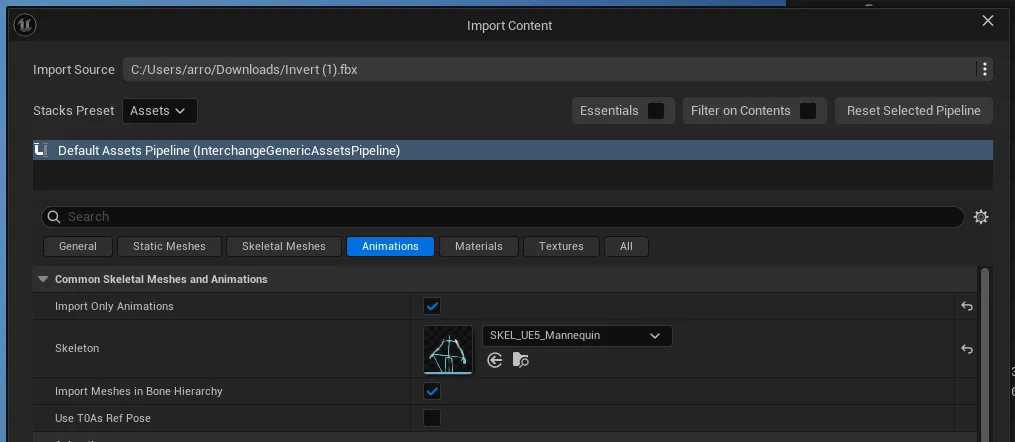
Skeleton Assignment
- Click the Import button.
- Delete one of the two generated animations. (Optional)
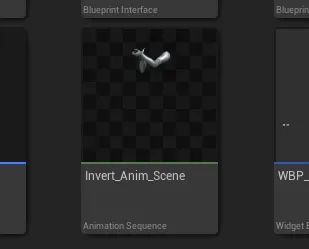
Animation Deletion
- Download the animation file.
- Modify the corrective animation.
- Open the Blueprint editor for the Inver_Anim_Scene animation sequence.
- Modify the Additive Settings in the Asset Details window.
- Additive Anim Type - Select Mesh Space
- Base Pose Type - Select Selected animation frame
- Base Pose Animation - Select A_FP_AssaultRifle_Idle_Loop
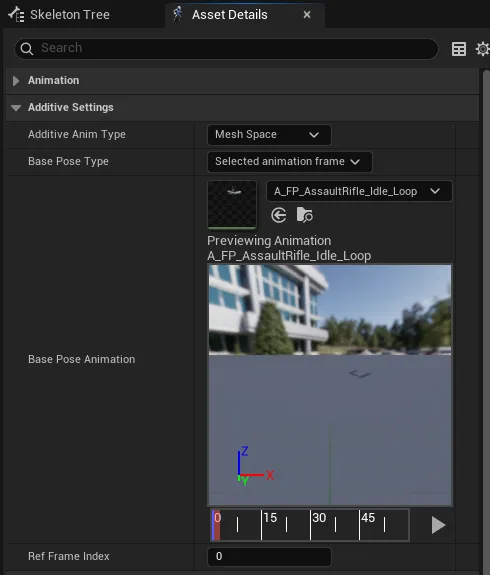
Additive Settings
- Modify the ABP_MirageCharacter Blueprint graph.
- Add Apply Additive node and Invert_Anim_Scene animation node.
- Connect with the A_FP_AssaultRifle_Idle_Loop animation node.
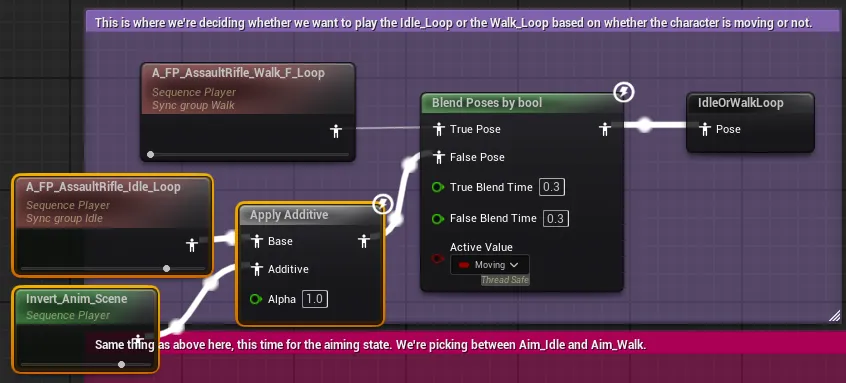
Apply Additive Node Connection
- Perform the same operation for the remaining 4 animation nodes. Use Inver_Anim_Scene and Apply Additive identically for all.
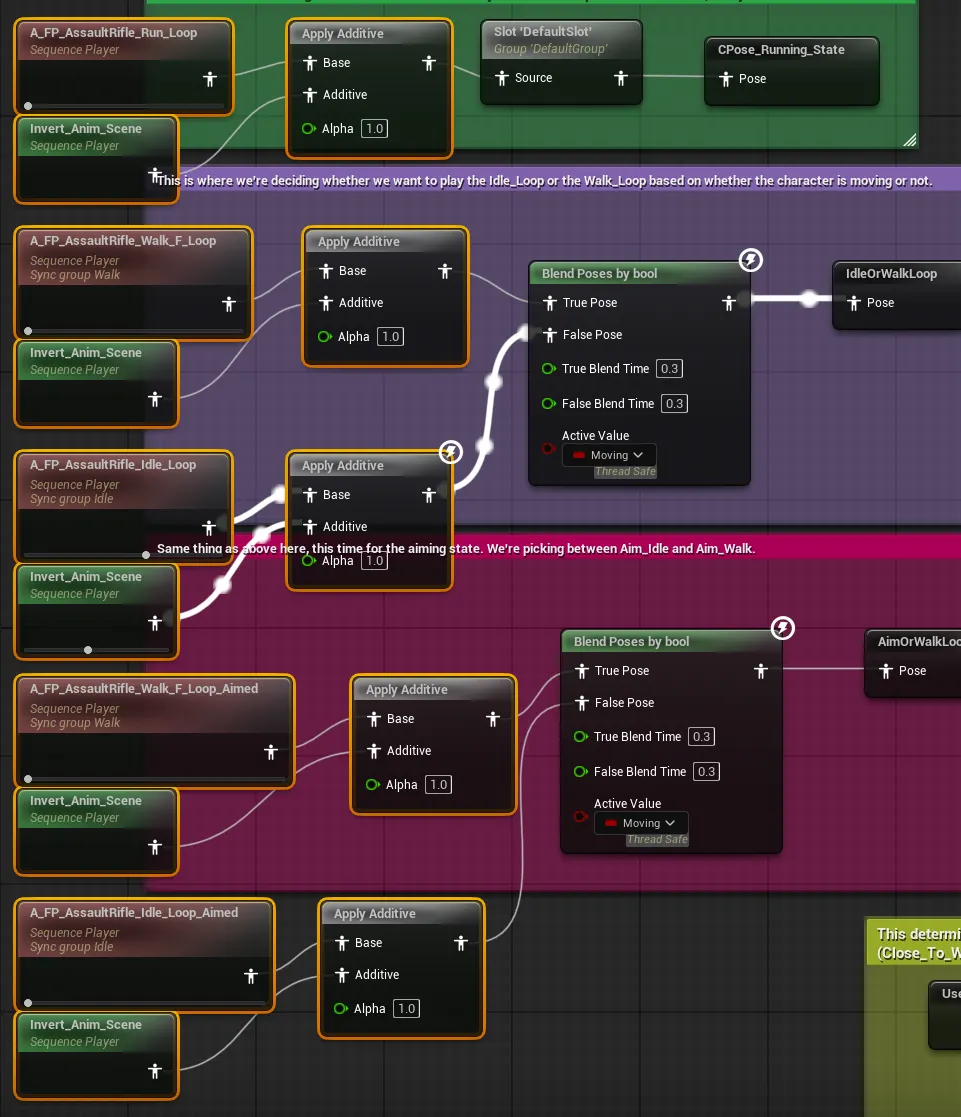
All Animation Node Modifications
- Run level and verify animation correction results
You can confirm that the arm skeleton positions have been corrected to normal ranges.
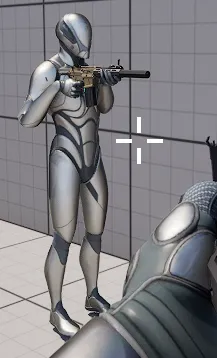
Animation Correction Results
4.2.3. Applying Leg Animation During Movement
- Modify the part connected to A_FP_AssaultRifle_Run_Loop in the ABP_MirageCharacter - AnimGraph Blueprint graph following the procedure below.
- Add a Layered blend per bone node.
- Modify the details of the added node.
- Settings - Layer Setup - Add two branch filters to Index[0].
- Specify the bone names as thigh_l and thigh_r respectively.
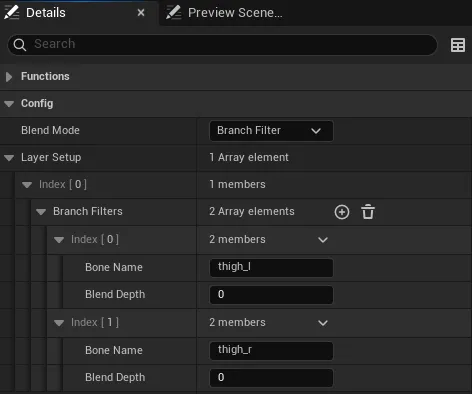
Layered Blend Per Bone Settings
- Connect the existing Apply Additive node to the Base Pose of the above node.
- Add an MM_Run_Fwd animation node and connect it to Blend Poses 0 of the above node.
- Enable animation loop in the details window of the MM_Run_Fwd node.
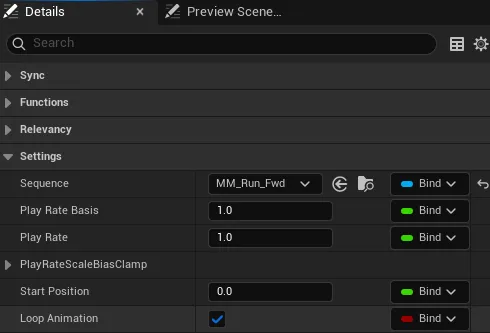
Animation Loop Activation
- The final appearance is as follows. Adjusting the size of comment nodes is optional.
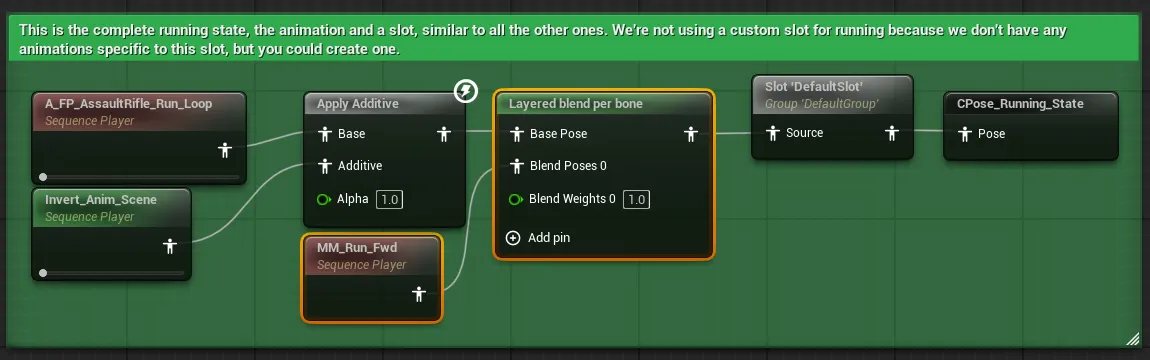
A_FP_AssaultRifle_Run_Loop Final Appearance
- Apply the above process similarly to the remaining 4 animation nodes.
- The Layered blend per bone node settings are identical, so you can copy and use them.
- Instead of the MM_Run_Fwd node, you should use MM_Walk_Fwd or MM_Idle as appropriate.
- After completing all processes, the graph appears as follows.
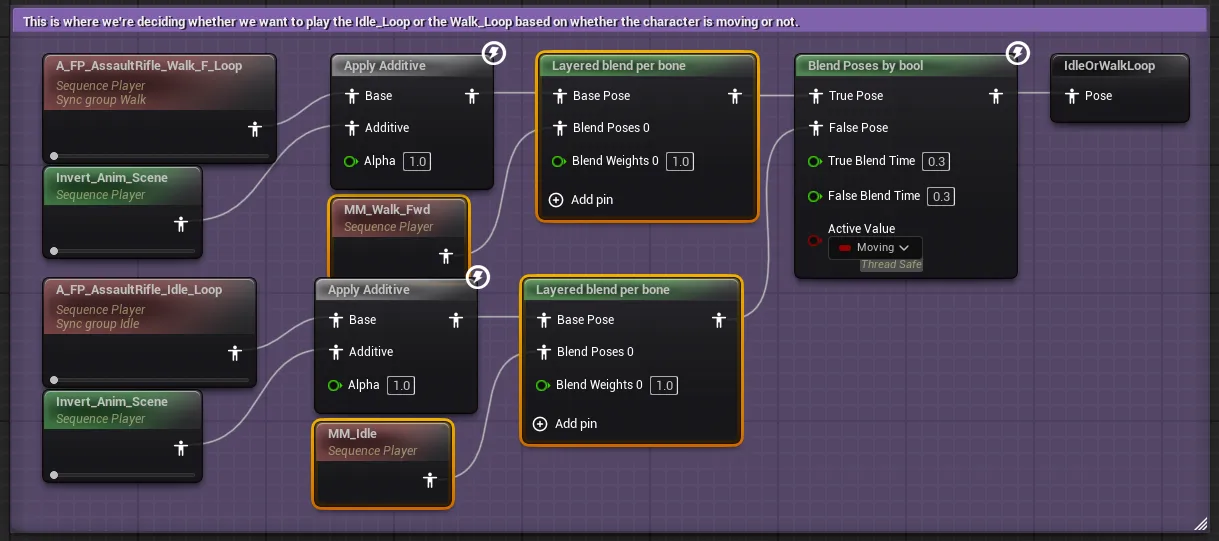
Complete Graph 1
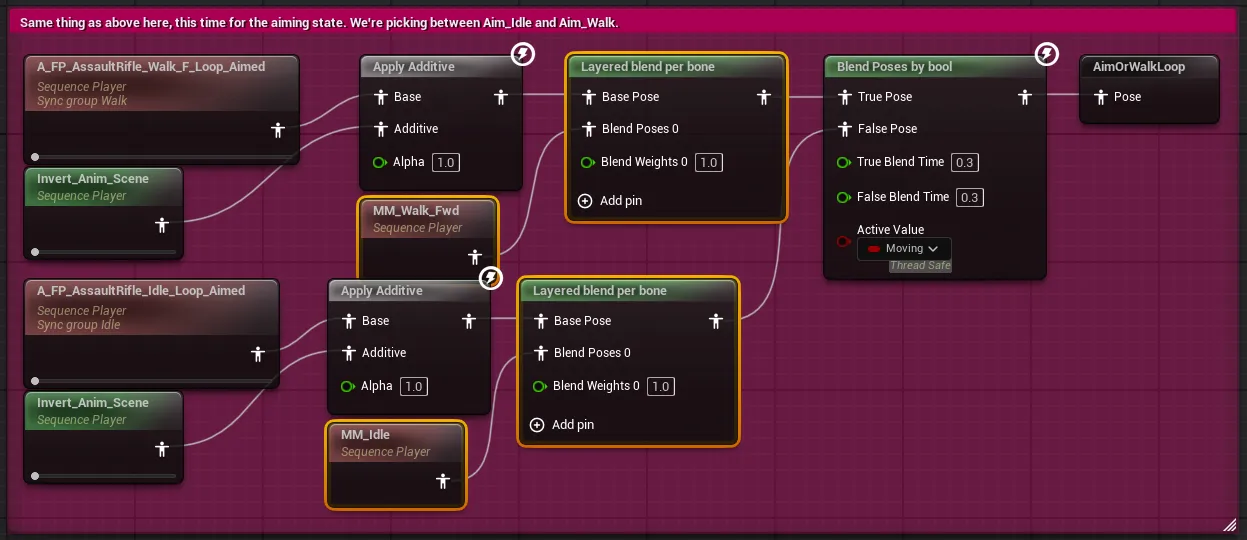
Complete Graph 2
- Run level and verify leg animation application
You can confirm that walking and running animations are being played.
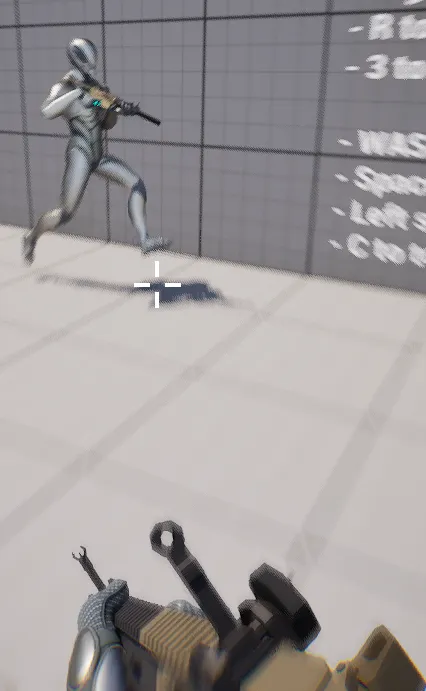
Leg Animation Verification
4.3. Action Animation and Motion Duplication
- Modify the source code of the BaseMirageCharacter class.
- Modifications
- BaseMirageCharacter.h
// Fill out your copyright notice in the Description page of Project Settings.

#pragma once

#include "CoreMinimal.h"
#include "GameFramework/Character.h"
#include "BaseMirageCharacter.generated.h"

UCLASS()
class PDNUE5EXAMPLECLIENT_API ABaseMirageCharacter : public ACharacter
{
	GENERATED_BODY()

public:
	// Sets default values for this character's properties
	ABaseMirageCharacter();

protected:
	// Called when the game starts or when spawned
	virtual void BeginPlay() override;

public:
	// Called every frame
	virtual void Tick(float DeltaTime) override;

	// Called to bind functionality to input
	virtual void SetupPlayerInputComponent(class UInputComponent* PlayerInputComponent) override;

	UFUNCTION(BlueprintCallable, BlueprintImplementableEvent)
	void UpdateAnimationParameter(bool aiming, bool closeToWall, bool moving, bool running, float jumpVelocity, FVector3f mouseSwayLocation, FVector3f moveSwayLocation);

+ 	UFUNCTION(BlueprintCallable, BlueprintImplementableEvent)
+ 	void OnFired();
+
+ 	UFUNCTION(BlueprintCallable, BlueprintImplementableEvent)
+ 	void OnReloaded();

};
- BaseMirageCharacter.h
- Modifications
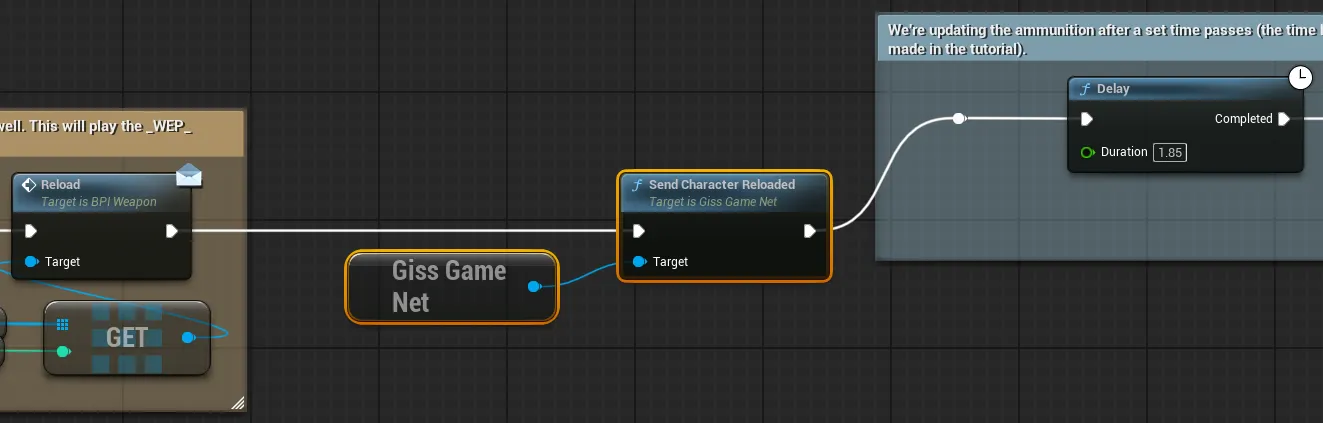
- Modify the BP_Character Blueprint graph.
- Create a graph that calls the mirage character's reload event when reloading.
- Navigate to the Reload-related area at the top of the graph.
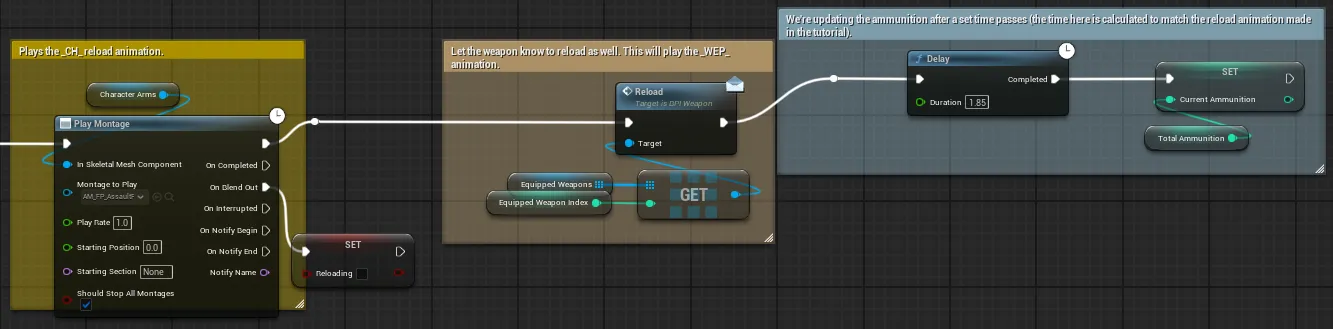
Reload Related Area
- Create a Get Actor Of Class node and specify BP_MirageCharacter for the class.
- Connect to the On Reloaded function node.
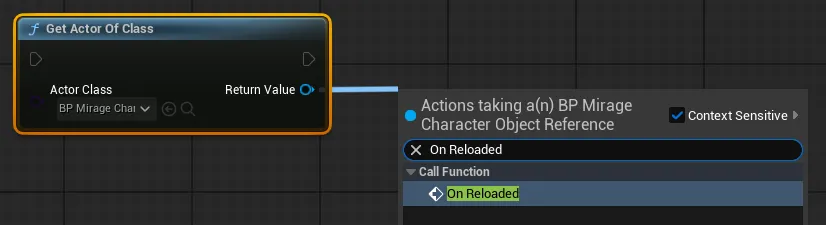
On Reloaded Node Addition
- Connect between the Reload and Delay functions.
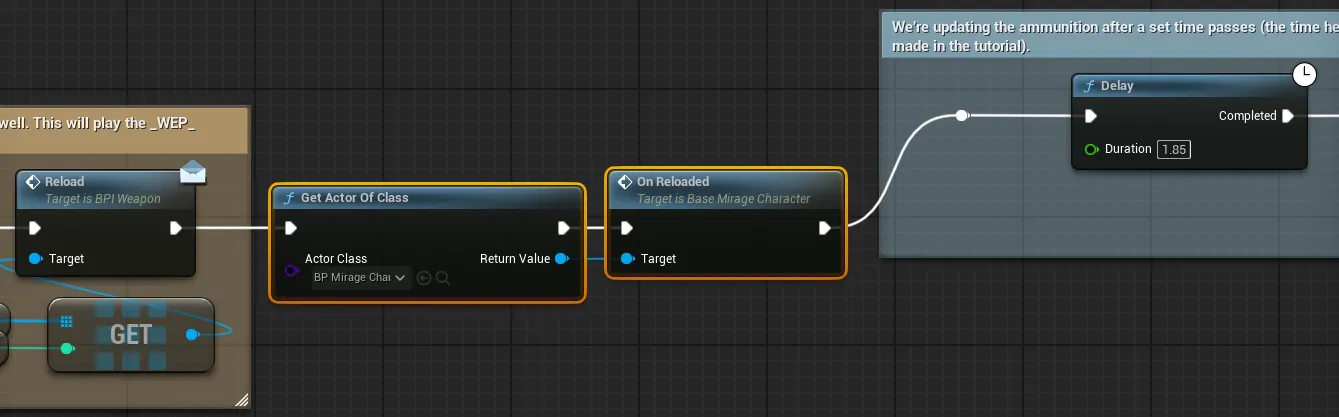
Reload Event Connection
- Navigate to the Reload-related area at the top of the graph.
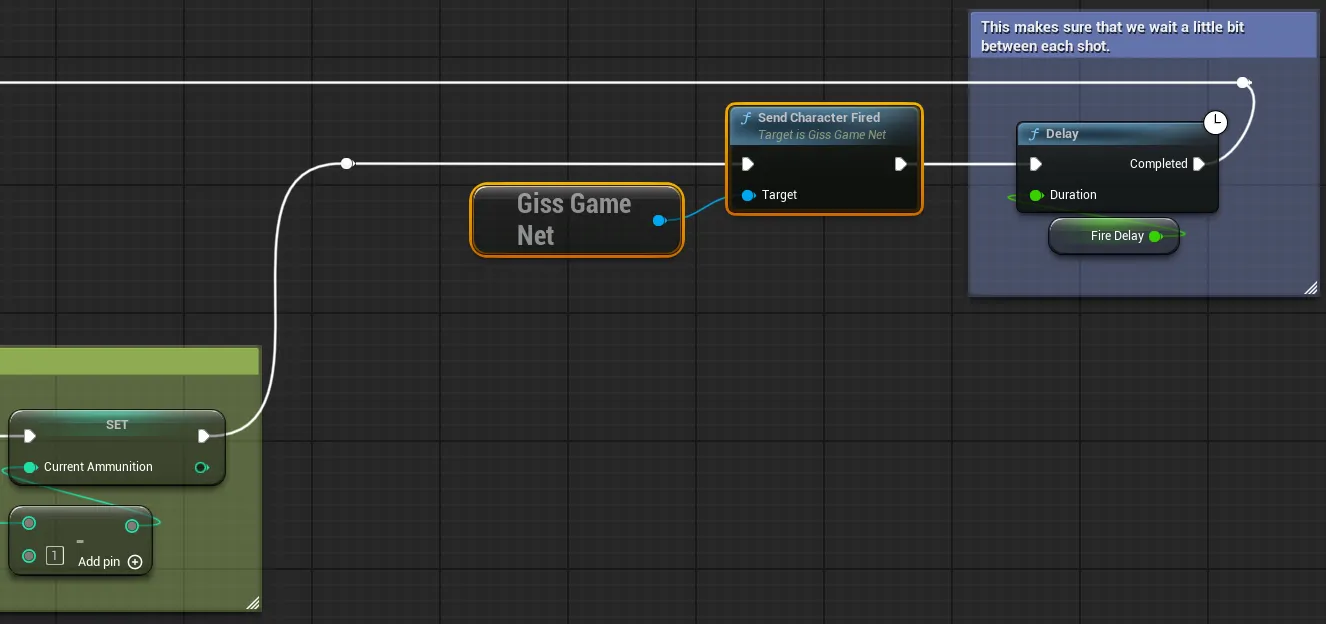
- Create a graph that calls the mirage character's fire event when shooting.
- Navigate to the end of the Shoot-related area on the right side of the graph.
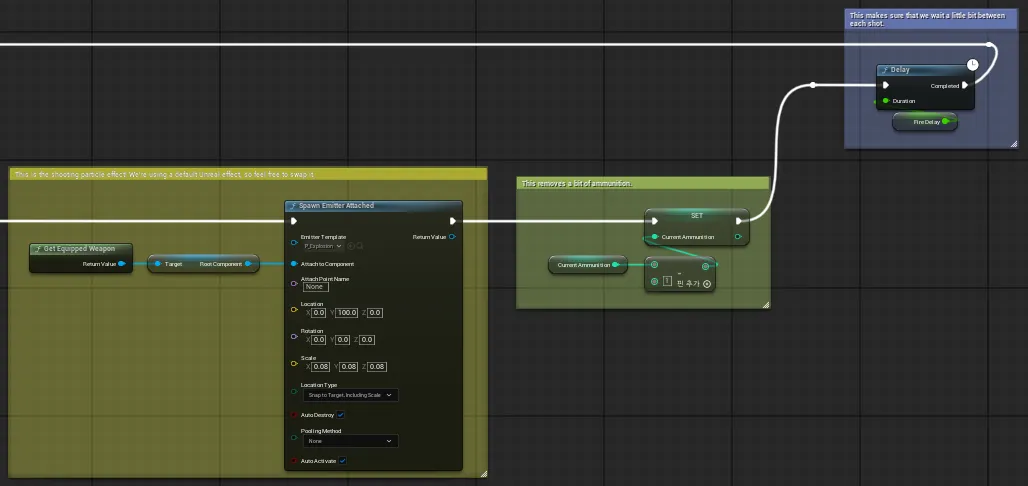
Shoot Related Area
- Create a Get Actor Of Class node and specify BP_MirageCharacter for the class.
- Connect to the On Fired function node.
- Connect between the (Current Ammunition) Set and Delay functions.

Shoot Event Connection
- Navigate to the end of the Shoot-related area on the right side of the graph.
- Create a graph that calls the mirage character's reload event when reloading.
- Modify the BP_MirageCharacter Blueprint graph.
- Navigate to the Reload-related area at the top of the graph.
- Connect the On Reloaded event node in front of the Play Montage node
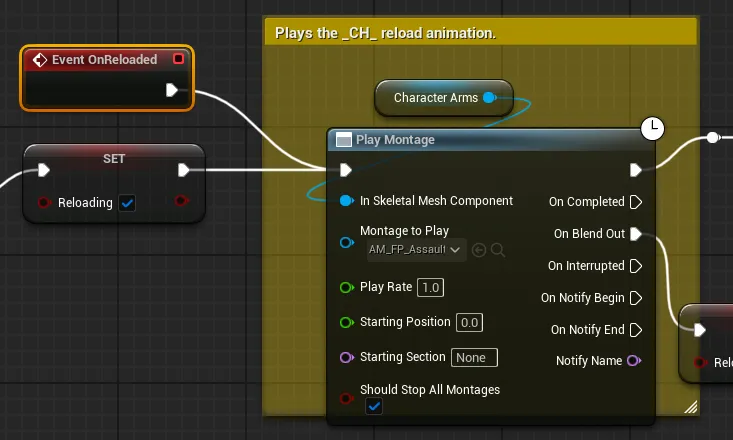
On Reloaded Event Connection
- Navigate to the Shoot-related area on the right side of the graph.
- Connect the On Fired event node in front of the Shoot node
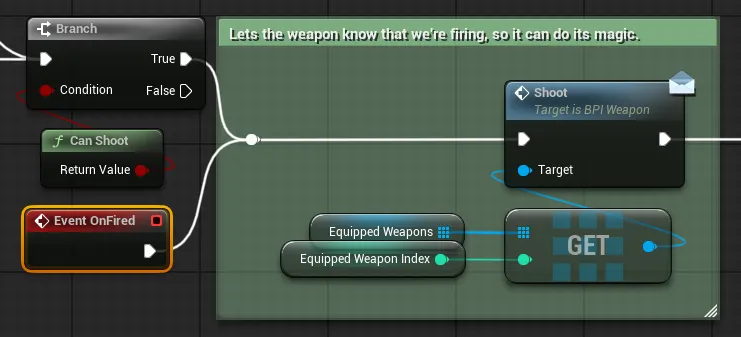
On Fired Event Connection
- Run the level and you can see the mirage character mimicking reload and fire actions.
Action Animation Test
4.4. Position, Rotation and Other Duplications
- Modify the source code of the BaseMirageCharacter class.
- Modifications
- BaseMirageCharacter.h
// Fill out your copyright notice in the Description page of Project Settings.

#pragma once

#include "CoreMinimal.h"
#include "GameFramework/Character.h"
#include "BaseMirageCharacter.generated.h"

UCLASS()
class PDNUE5EXAMPLECLIENT_API ABaseMirageCharacter : public ACharacter
{
	GENERATED_BODY()

public:
	// Sets default values for this character's properties
	ABaseMirageCharacter();

protected:
	// Called when the game starts or when spawned
	virtual void BeginPlay() override;

public:
	// Called every frame
	virtual void Tick(float DeltaTime) override;

	// Called to bind functionality to input
	virtual void SetupPlayerInputComponent(class UInputComponent* PlayerInputComponent) override;

+ 	UFUNCTION(BlueprintCallable, BlueprintImplementableEvent)
+ 	void UpdateTransform(FVector3f position, FQuat4f orientation, FVector3f linearVelocity, FVector3f angularVelocity, float aimPitch);

	UFUNCTION(BlueprintCallable, BlueprintImplementableEvent)
	void UpdateAnimationParameter(bool aiming, bool closeToWall, bool moving, bool running, float jumpVelocity, FVector3f mouseSwayLocation, FVector3f moveSwayLocation);

	UFUNCTION(BlueprintCallable, BlueprintImplementableEvent)
	void OnFired();

	UFUNCTION(BlueprintCallable, BlueprintImplementableEvent)
	void OnReloaded();

};
- BaseMirageCharacter.h
- Complete Code
- BaseMirageCharacter.h
// Fill out your copyright notice in the Description page of Project Settings.

#pragma once

#include "CoreMinimal.h"
#include "GameFramework/Character.h"
#include "BaseMirageCharacter.generated.h"

UCLASS()
class PDNUE5EXAMPLECLIENT_API ABaseMirageCharacter : public ACharacter
{
	GENERATED_BODY()

public:
	// Sets default values for this character's properties
	ABaseMirageCharacter();

protected:
	// Called when the game starts or when spawned
	virtual void BeginPlay() override;

public:
	// Called every frame
	virtual void Tick(float DeltaTime) override;

	// Called to bind functionality to input
	virtual void SetupPlayerInputComponent(class UInputComponent* PlayerInputComponent) override;

	UFUNCTION(BlueprintCallable, BlueprintImplementableEvent)
	void UpdateTransform(FVector3f position, FQuat4f orientation, FVector3f linearVelocity, FVector3f angularVelocity, float aimPitch);

	UFUNCTION(BlueprintCallable, BlueprintImplementableEvent)
	void UpdateAnimationParameter(bool aiming, bool closeToWall, bool moving, bool running, float jumpVelocity, FVector3f mouseSwayLocation, FVector3f moveSwayLocation);

	UFUNCTION(BlueprintCallable, BlueprintImplementableEvent)
	void OnFired();

	UFUNCTION(BlueprintCallable, BlueprintImplementableEvent)
	void OnReloaded();

};
- BaseMirageCharacter.h
- Modifications
- Modify the BP_Character Blueprint graph.
- Add a float type AimPitch variable.
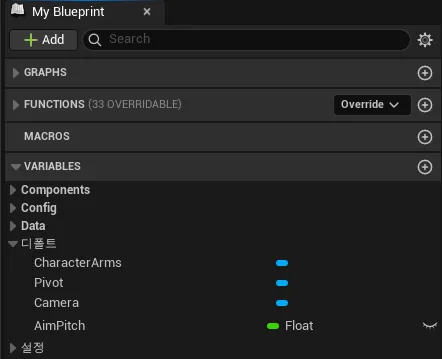
AimPitch Variable Addition
- Navigate to the end of the Tick event code.
- Create two route nodes and connect the Branch node's False and Stop Running nodes.
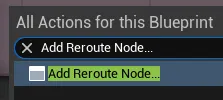
Route Node 1
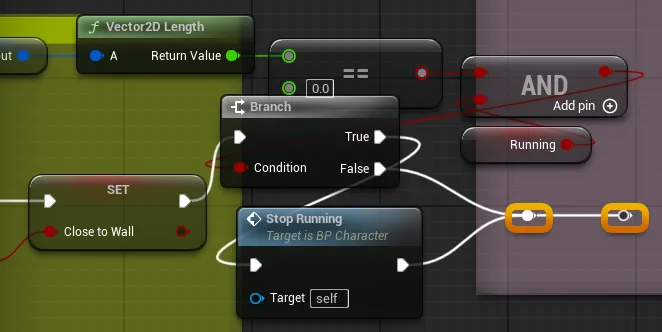
Route Node 2
- Move the route nodes.
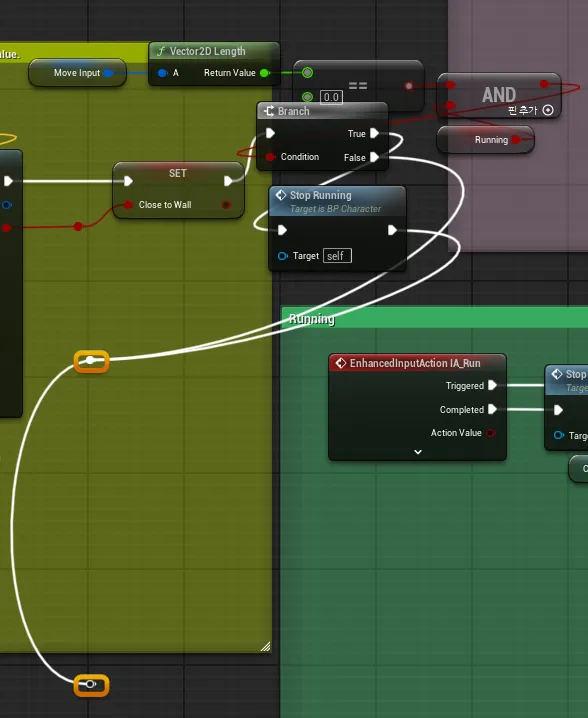
Route Node Movement
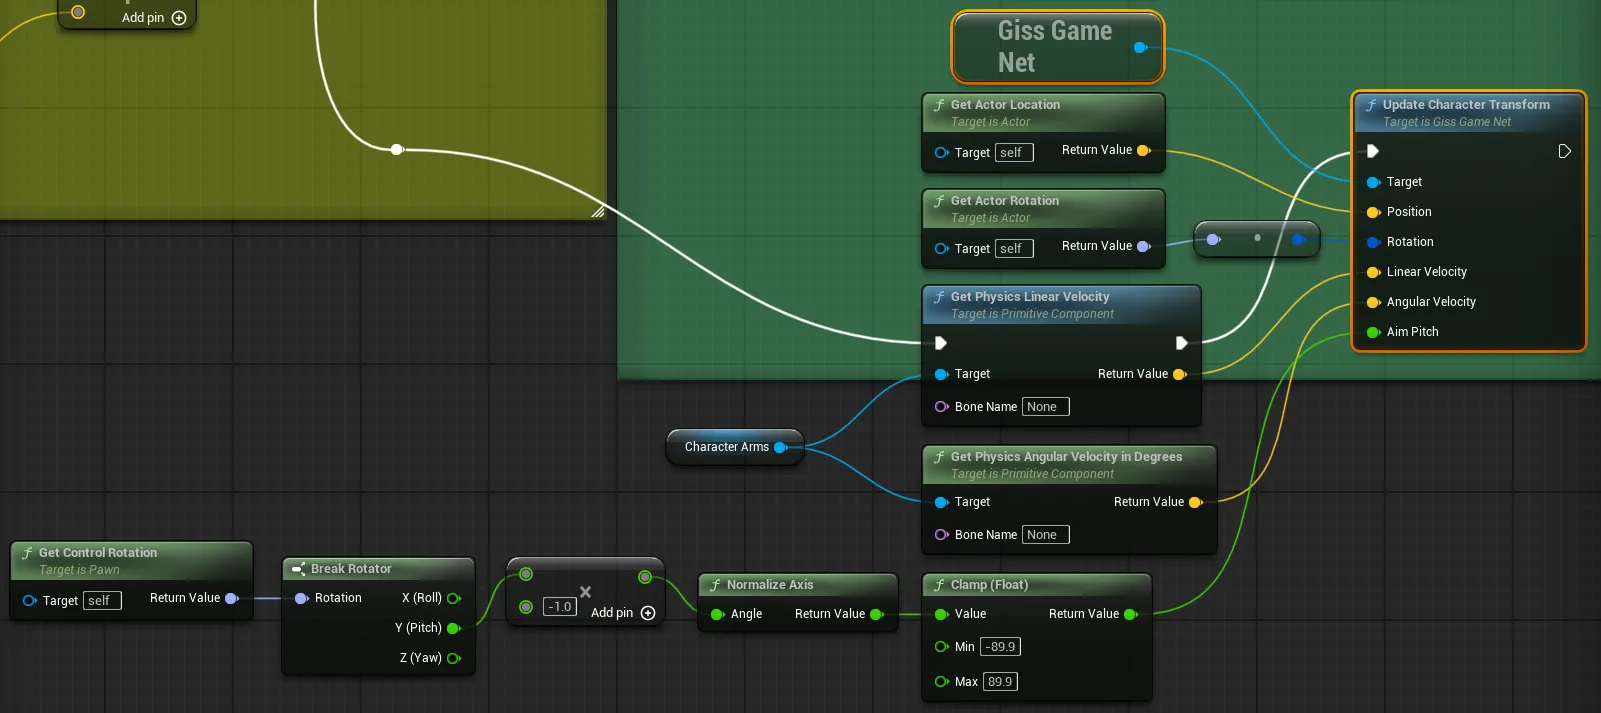
- Create a graph that calls BP_MirageCharacter's Update Transform
The completed graph appearance is as follows, and you can check the process below.
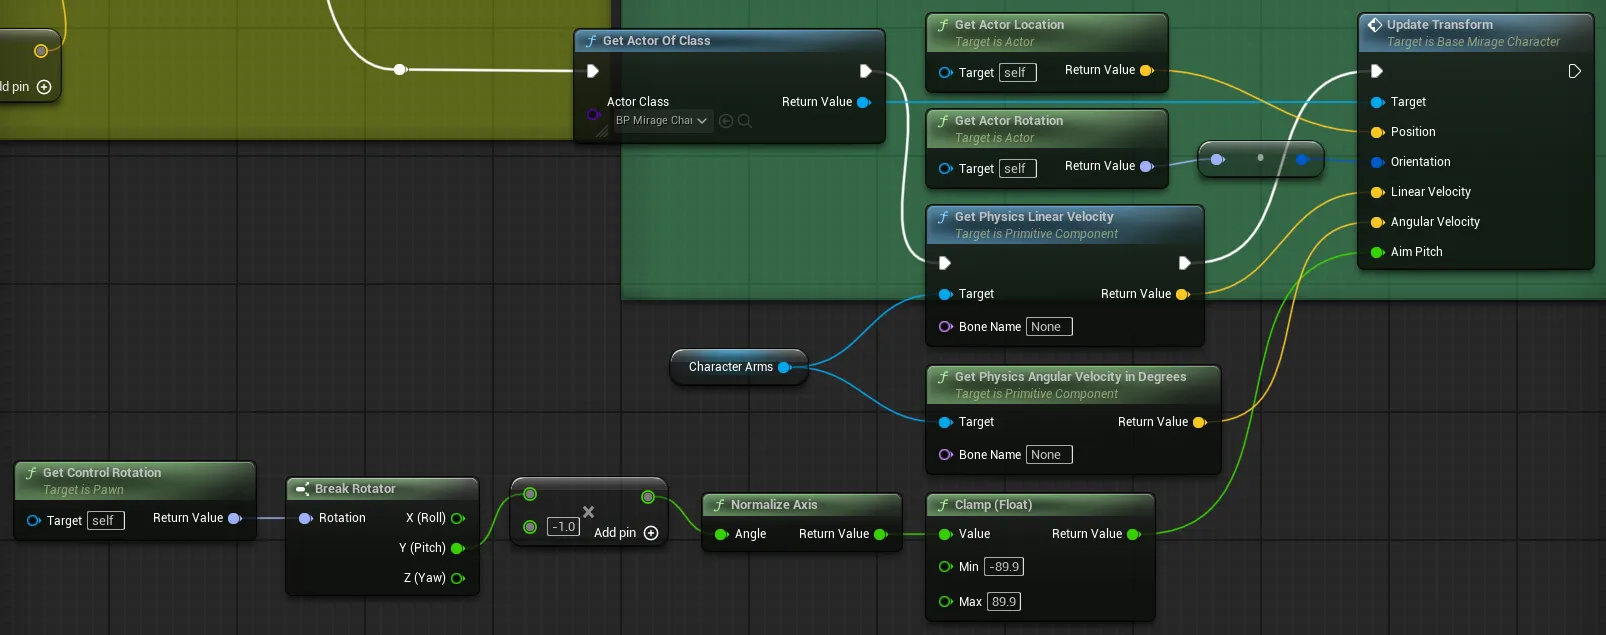
Update Transform Graph Complete
View Process
- Create a Get Actor Of Class node and specify BP_MirageCharacter for the class.
- Connect to the Update Transform function node.

Update Transform Node Addition
- Create nodes that get position/rotation values using Get Actor Location and Get Actor Rotation.
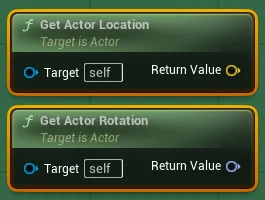
Position/Rotation Node Addition
- Connect Get Actor Rotation to the To Quaternion node.
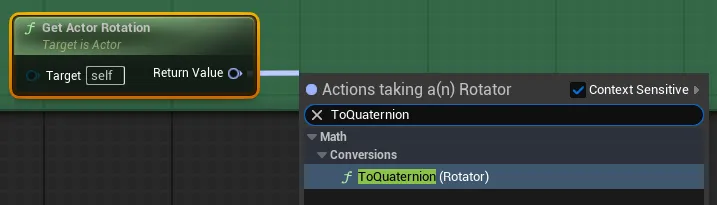
To Quaternion Connection
- Create a Get Character Arms node and connect to nodes that get velocity and angular velocity.
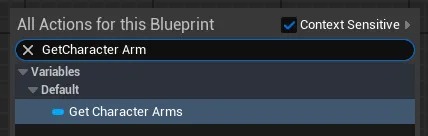
Character Arms Node
Velocity/Angular Velocity Nodes
- Create a Get Control Rotation node and calculate the Pitch rotation value from the return value.
All nodes can be connected through node names.
The multiplication node in the middle can be created with Multiply.

Control Rotation and Pitch Calculation
- Connect all added nodes to the appropriate parameters of Update Transform. The Get Physics Linear Velocity node must have its execution pin connected.
- Add a float type AimPitch variable.
- Modify the BP_MirageCharacter Blueprint graph.
- Add a float type AimPitch variable.
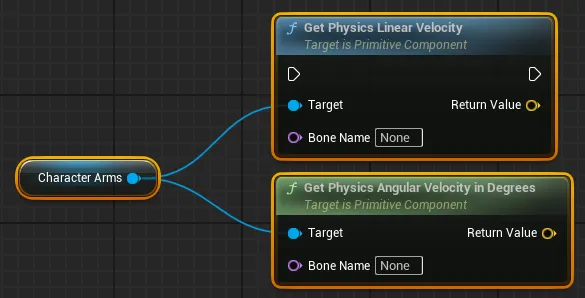
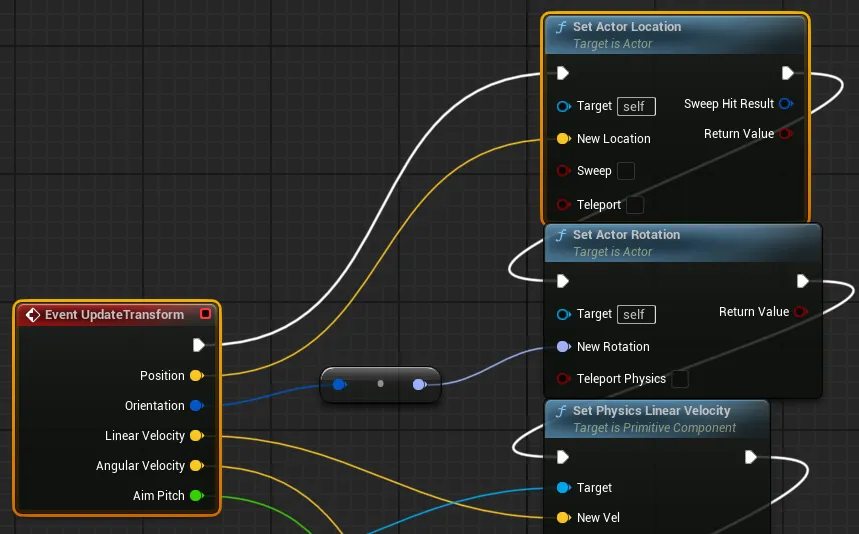
- Add an UpdateTransform event node.
- Add and connect each node appropriate for the event node.
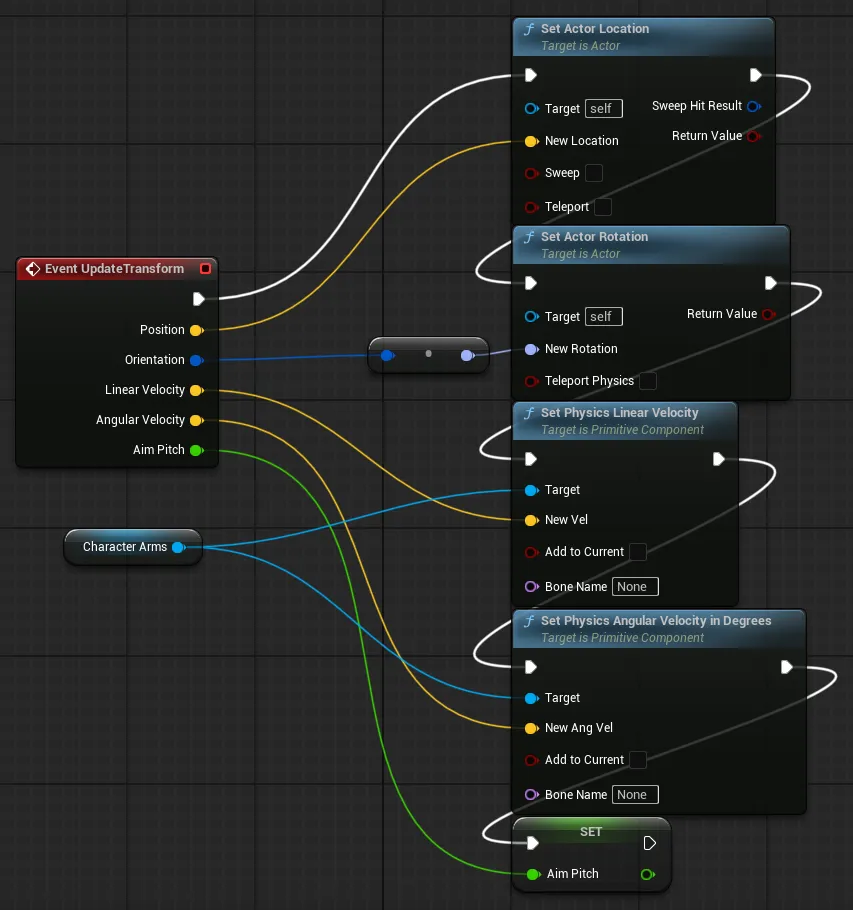
BP_MirageCharacter UpdateTransform Implementation
- Disconnect the Position node connection and add a Make Vector node to connect.
This is a measure to prevent bug behavior in single test environments.
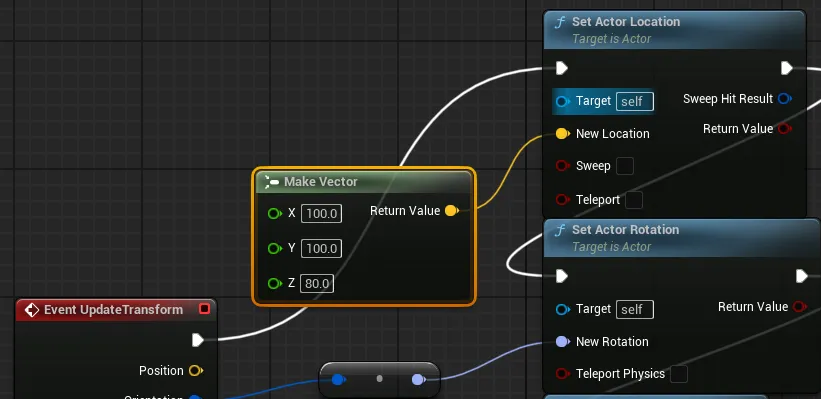
Position Make Vector Connection
- Navigate to the Shoot-related section.
- Configure and connect the graph as follows.
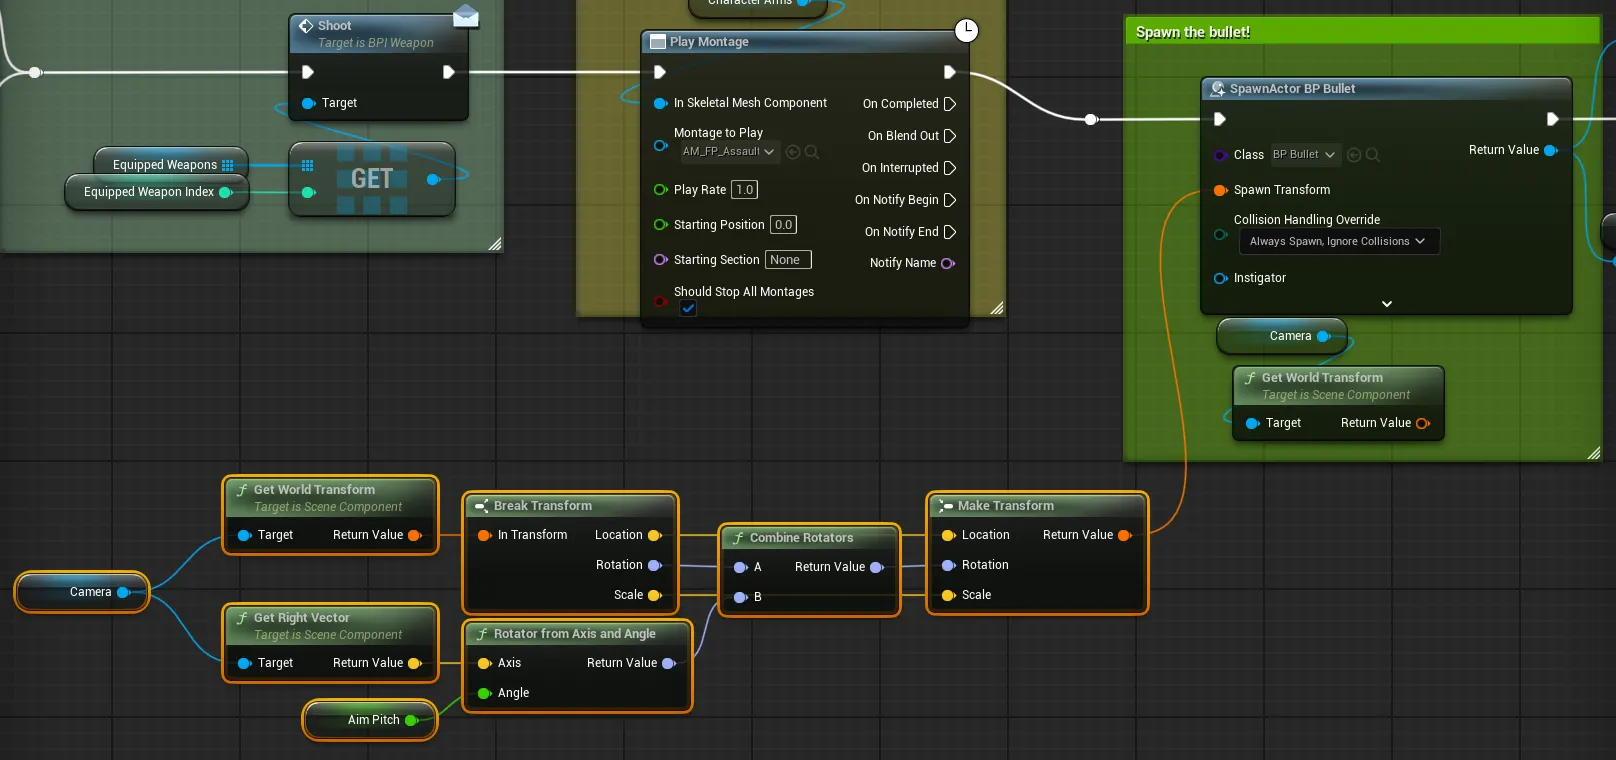
Shoot Related Graph Configuration
- Modify the event graph of the ABP_MirageCharacter Blueprint.
- Add a float type AimPitch variable.
- Retrieve and store values from the cast BP_MirageCharacter.
ABP_MirageCharacter AimPitch Variable
- Modify the AnimGraph of the ABP_MirageCharacter Blueprint.
- Navigate to the Mouse Sway related section.
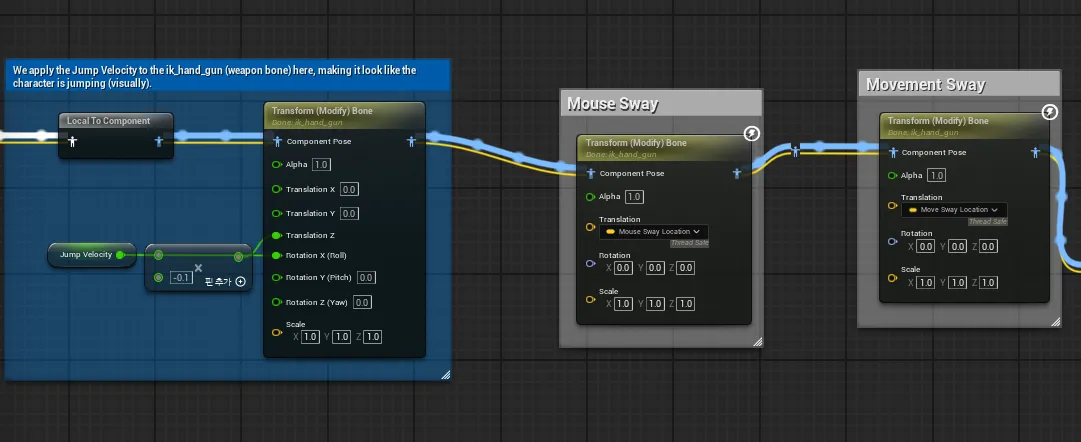
Mouse Sway Related Section
- Add a Transform (Modify) Bone node and connect it in front of the Mouse Sway comment node.
- Create a Rotator with the AimPitch variable value and apply it to the node's Rotation.
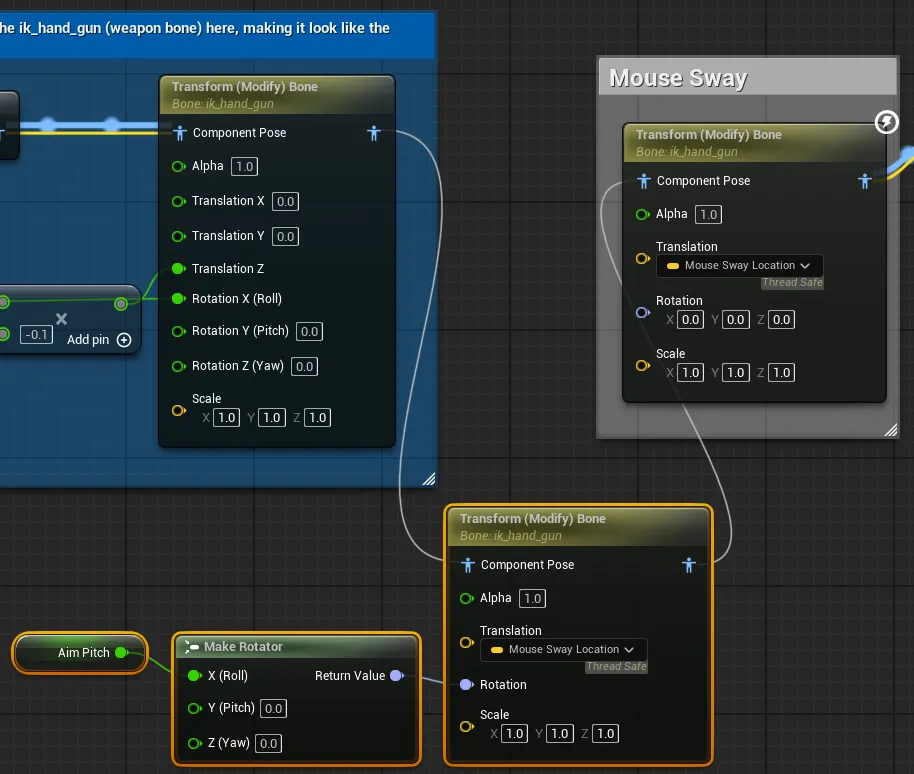
Transform Bone Node Application
- Navigate to the Mouse Sway related section.
- Run the level and test the functionality.
The mirage character now aims and fires in the same direction as the player character.
Position Rotation Duplication Test
5. Mirage Character Online Integration
This section covers integrating mirage character with ProudNet networking for multiplayer gameplay.
5.1. Visual Studio Project Work
5.1.1. game_server Project Creation
- Create an empty project game_server in Visual Studio
- Add 3 new items to the game_server project: main.cpp, setting.cpp, setting.h.
- Modify the properties of the game_server project.
- "C/C++ - Language - C++ Language Standard" Select "ISO C++20 Standard (/std:C++20)" from the dropdown
- "C/C++ - General - Additional Include Directories"
Select <Edit…> from the dropdown
Add the following path in the popup window
C:\Program Files (x86)\Nettention\ProudNet\include
- "Linker - General - Additional Library Directories"
Select <Edit…> from the dropdown
Add the following path in the popup window
C:\Program Files (x86)\Nettention\ProudNet\lib\$(Platform)\v140\$(Configuration)
- "Linker - Input - Additional Dependencies"
Select <Edit…> from the dropdown
Add the following filenames in the popup window
ProudNetServer.lib
ProudNetClient.lib
- "Build Events - Post-Build Event - Command Line"
Select <Edit…> from the dropdown
Add the following commands in the popup window
xcopy /Y "C:\Program Files (x86)\Nettention\ProudNet\lib\$(Platform)\v140\$(Configuration)\libcrypto-3-x64.dll" "$(OutDir)"
xcopy /Y "C:\Program Files (x86)\Nettention\ProudNet\lib\$(Platform)\v140\$(Configuration)\libssl-3-x64.dll" "$(OutDir)"
- Enter code into each source file.
- Complete Code
- setting.h
#pragma once namespace ProudSetting { namespace GAME { extern const ::Proud::Guid version; extern const int server_port; } } - setting.cpp
#include <ProudNetClient.h> #include "setting.h" namespace ProudSetting { namespace GAME { const ::Proud::PNGUID guid = { 0x3ae33249, 0xecc6, 0x4980, { 0xbc, 0x5d, 0x7b, 0xa, 0x99, 0x9c, 0x7, 0x39 } }; const ::Proud::Guid version = ::Proud::Guid(guid); const int server_port = 33338; } } - main.cpp
#include <iostream>
#include <format>
#include <memory>

#include <ProudNetServer.h>
#include "setting.h"

std::shared_ptr<Proud::CNetServer> net_server;

int main()
{
	net_server = std::shared_ptr<Proud::CNetServer>(Proud::CNetServer::Create());

	net_server->OnClientJoin = [](Proud::CNetClientInfo* clientInfo)
		{
			std::cout << "Client[" << (int)clientInfo->m_HostID << "] connected.\n";
		};
	net_server->OnClientLeave = [](Proud::CNetClientInfo* clientInfo, Proud::ErrorInfo* error, const Proud::ByteArray byte_arr)
		{
			std::cout << "Client[" << (int)clientInfo->m_HostID << "] disconnected.\n";
		};

	Proud::CStartServerParameter start_param;
	start_param.m_protocolVersion = ProudSetting::GAME::version;
	start_param.m_tcpPorts.Add(ProudSetting::GAME::server_port);

	try
	{
		net_server->Start(start_param);
	}
	catch (Proud::Exception& error)
	{
		std::cout << "Server start failed: " << error.what() << endl;
		return 0;
	}

	std::cout << ("Server started. Enterable commands:\n");
	std::cout << ("-q : Quit.\n");
	std::string input;
	while (true)
	{
		std::cin >> input;
		if (input[0] == '-')
		{
			if (input == "-q")
				break;
		}
	}

	std::cout << "Stopping server...\n";
	net_server->Stop();
	net_server = nullptr;
	std::cout << "Server stopped.\n";
	return 0;
}
- setting.h
- Complete Code
5.1.2. game_pidl Project Creation
- Add a new empty project game_pidl in PdnUE5ExampleServer.
- Add file P2P.PIDL and modify its properties.
- "General - Item Type" Select "Custom Build Tool" from the dropdown
- "Custom Build Tool - General - Command Line"
Enter text
C:\"Program Files (x86)"\Nettention\ProudNet\util\PIDL.exe "%(FullPath)" -cpp
- "Custom Build Tool - General - Description"
Enter text
%(Filename).PIDL Compiling...
- "Custom Build Tool - General - Outputs"
Select <Edit…> from the dropdown
Add the following paths in the popup window
%(RootDir)%(Directory)\%(Filename)_common.cpp
%(RootDir)%(Directory)\%(Filename)_common.h
%(RootDir)%(Directory)\%(Filename)_proxy.cpp
%(RootDir)%(Directory)\%(Filename)_proxy.h
%(RootDir)%(Directory)\%(Filename)_stub.cpp
%(RootDir)%(Directory)\%(Filename)_stub.h
- Enter code into the file.
- Complete Code
- P2P.PIDL
[access=public]
global GAME_P2P 3000
{
    Transform([in] Proud::CharacterTransformData transformData);
    AnimationParams([in] Proud::CharacterAnimationParams animationParams);
    Action([in] Proud::CharacterAction actionId);
}
- P2P.PIDL
- Complete Code
- Build the game_pidl project.
5.1.3. game_server Project Source Code Modification
- Modify the source code of the game_server project.
- Apply modifications to add P2P group management functionality.
- Add data structures and serialization functions to setting.h and setting.cpp.
5.2. Unreal Project Work
- GissGameNet C++ Class Creation
- Create a C++ class GissGameNet that inherits from GameInstanceSubsystem.
- Modify the source code of the GissGameNet class.
- GissGameNet.h
// Fill out your copyright notice in the Description page of Project Settings.

#pragma once

#include "CoreMinimal.h"
#include "Subsystems/GameInstanceSubsystem.h"
#include "GissGameNet.generated.h"

/**
 *
 */
UCLASS()
class PDNUE5EXAMPLECLIENT_API UGissGameNet : public UGameInstanceSubsystem
{
	GENERATED_BODY()

public:
	UFUNCTION(BlueprintCallable)
	void UpdateCharacterTransform(FVector3f position, FQuat4f rotation, FVector3f linearVelocity, FVector3f angularVelocity, float aimPitch);

	UFUNCTION(BlueprintCallable)
	void UpdateCharacterAnimationParameter(bool aiming, bool closeToWall, bool moving, bool running, float jumpVelocity, FVector3f mouseSwayLocation, FVector3f moveSwayLocation);

	UFUNCTION(BlueprintCallable)
	void SendCharacterFired();

	UFUNCTION(BlueprintCallable)
	void SendCharacterReloaded();

private:
	virtual void Initialize(FSubsystemCollectionBase& Collection) override;
	virtual void Deinitialize() override;
};
- GissGameNet.h
- Modify the BP_Character Blueprint graph.
- Replace the graph that calls BP_MirageCharacter's Update Transform with a graph that calls GissGameNet's Update Character Transform.
Update Character Transform Change
- Replace the graph that calls BP_MirageCharacter's On Fired with a graph that calls GissGameNet's Send Character Fired.
Send Character Fired Change
- Replace the graph that calls BP_MirageCharacter's On Reloaded with a graph that calls GissGameNet's Send Character Reloaded.
Send Character Reloaded Change
- Replace the graph that calls BP_MirageCharacter's Update Transform with a graph that calls GissGameNet's Update Character Transform.
- Modify the event graph of the ABP_Character Blueprint.
- Replace the graph that calls BP_MirageCharacter's Update Animation Parameter with a graph that calls GissGameNet's Update Character Animation Parameter.
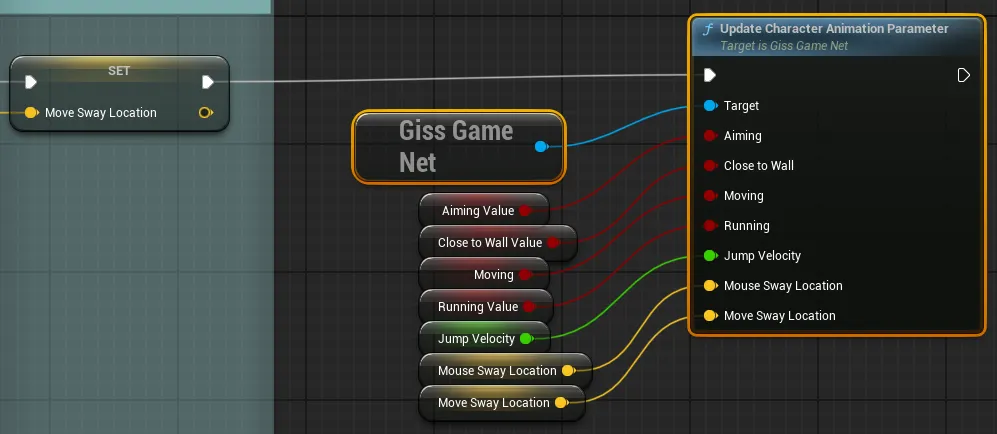
Update Character Animation Parameter Change
- Replace the graph that calls BP_MirageCharacter's Update Animation Parameter with a graph that calls GissGameNet's Update Character Animation Parameter.
- After building and running the server, when running the level, you can confirm the same results as before the integration work.
6. Final Project Build and Testing
This section covers project finalization, build, and comprehensive testing procedures.
6.1. Test Code Modification
- Modify the BaseMirageCharacter class code.
- Add SetId and GetId functions for character ID management.
- Modify the GissGameNet class code.
- Implement an ID-based management system for character identification in multiplayer environments.
- Add functionality to automatically create mirage characters when P2P members join.
- Modify to disable loopback so that one's own actions are not sent back to oneself.
- Modify the BP_MirageCharacter Blueprint class.
- Reconnect the Position of the Update Transform event directly to Set Actor Location.
Position Direct Connection
- Reconnect the Position of the Update Transform event directly to Set Actor Location.
- Remove the BP_MirageCharacter instance from the Outliner window in the Level Editor.
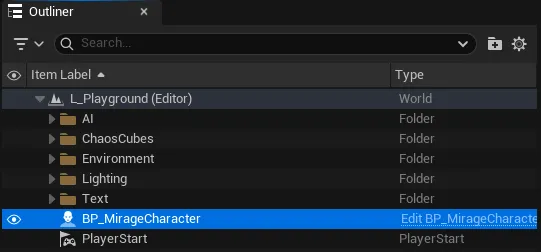
MirageCharacter Instance Removal
6.2. Project Build
- Server Executable Build
- Change the build configuration through the dropdown at the top of Visual Studio.
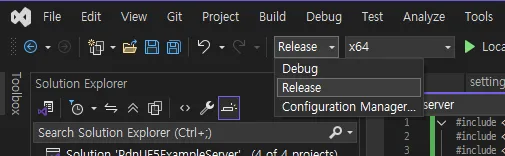
Build Configuration Change
- Build the chat_server and game_server projects respectively.
- You can check the built executable files in the solution's subfolders.
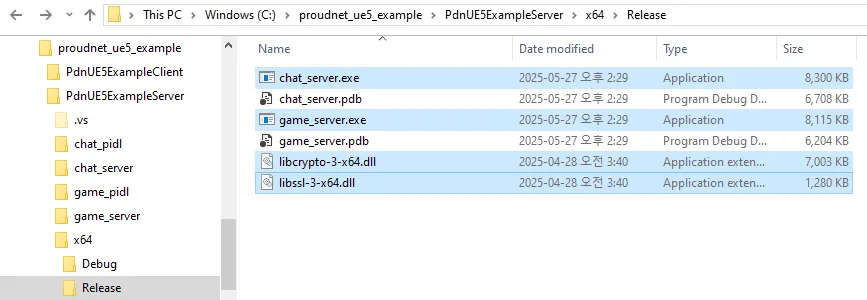
Built Executable Files
- Change the build configuration through the dropdown at the top of Visual Studio.
- Client Executable Build
- You can build the Unreal project through the button next to level execution in the Unreal Editor.
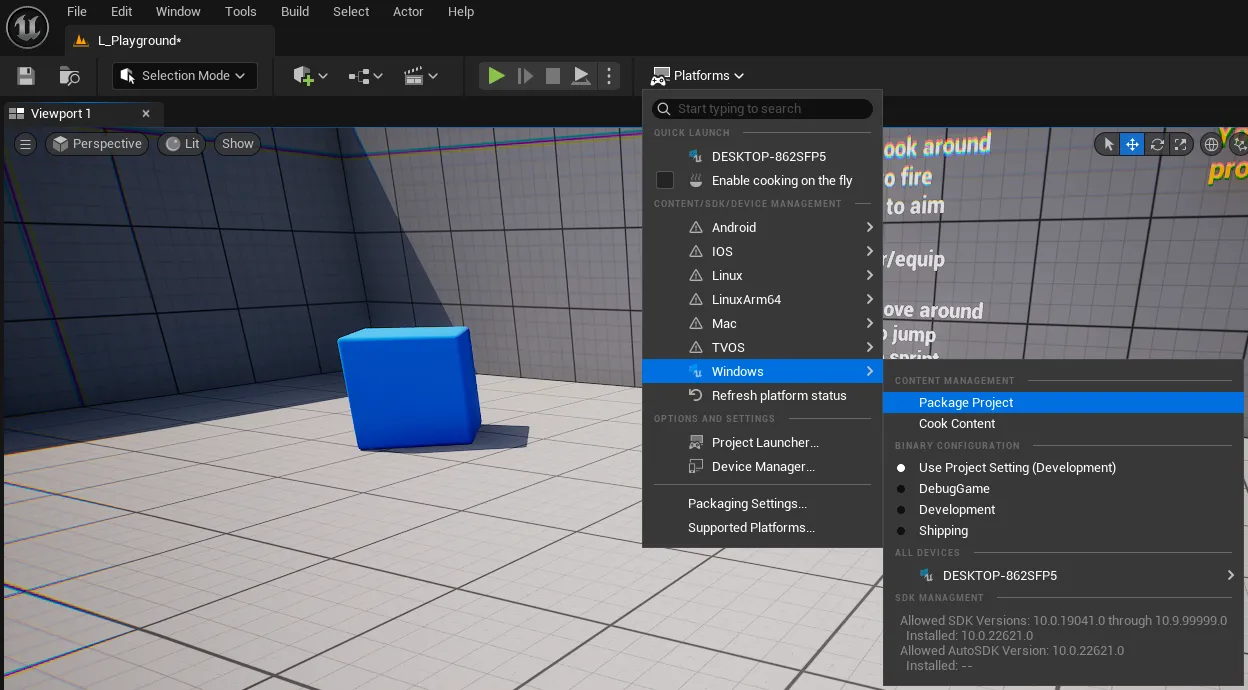
Unreal Project Build
- You can check the built files through the specified path.
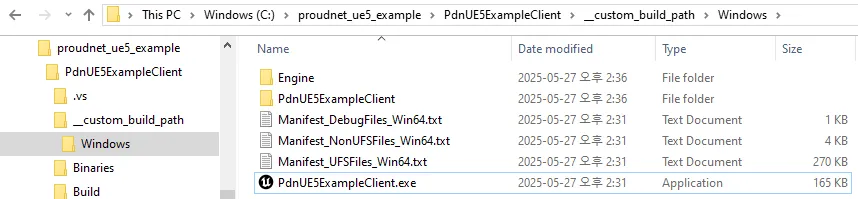
Built Client Files
- You can build the Unreal project through the button next to level execution in the Unreal Editor.
6.3. Testing
- Run the built chat_server.exe and game_server.exe from the server project.
- Run PdnUE5ExampleClient.exe from the Windows folder built in the Unreal project. Be careful as this may put a heavy load on the computer depending on your PC specifications.
- You can see two clients using the chat server and game server.

Final Test Results